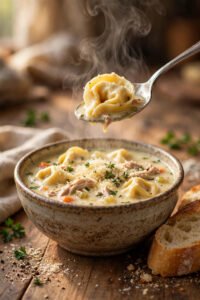

Creamy Tuscan Chicken Soup With Spinach and Sun-Dried Tomatoes
Ingredients
Method
- Gather and prepare all ingredients before starting. Dice the onion, mince the garlic, cut the chicken breast into 1-inch pieces, and roughly chop the spinach.
- Heat the olive oil in a large saucepan over medium heat. Add the diced onion and cook for approximately 5 minutes, stirring occasionally, until softened and translucent.
- Add the minced garlic and cook for about 1 minute, stirring frequently until fragrant. Stir in the tomato paste until evenly combined with the onion and garlic.
- Pour in the chicken bone broth. Add the chicken pieces, chopped spinach, sun-dried tomatoes, and Tuscan seasoning. Stir gently to combine.
- Add the high-protein pasta and bring the soup to a gentle simmer. Cook for approximately 10 minutes, stirring occasionally, until the pasta is tender but still slightly firm and the chicken is fully cooked. The chicken should reach an internal temperature of 165°F (74°C).
- Sprinkle in the finely grated Parmesan cheese and stir until incorporated into the broth.
- Pour in the heavy cream and stir gently until the soup becomes creamy and evenly combined.
- Serve the Tuscan chicken soup hot.
Notes
- This recipe makes 2 servings and can be doubled or tripled when cooking for more people.
- Keep the soup at a gentle simmer while cooking the chicken and pasta.
- Check the pasta for doneness before adding the Parmesan and heavy cream.
- After adding the cream, avoid a vigorous boil to maintain a smooth consistency.
Some soups are light enough to serve as a starter, while others are satisfying enough to become the entire meal. This creamy Tuscan chicken soup falls into the second category.
With tender chicken, pasta, vegetables, and a creamy Parmesan broth, it brings together everything needed for a comforting bowl of soup without requiring hours of cooking.
- Rich, savory flavor: Sun-dried tomatoes, garlic, Tuscan seasoning, and Parmesan create a flavorful broth with a pleasant balance of creamy and tangy notes.
- A satisfying one-pot meal: Chicken, pasta, and spinach cook together in a single saucepan, making preparation and cleanup easier.
- Creamy without being overly heavy: A small amount of heavy cream gives the broth a smooth finish while allowing the tomato and herb flavors to stand out.
- Perfect for smaller households: The recipe makes two servings, so it’s convenient when cooking for one or two people.
- Easy to adjust: Different pasta shapes, leafy greens, or additional broth can help customize the soup to your preferences.
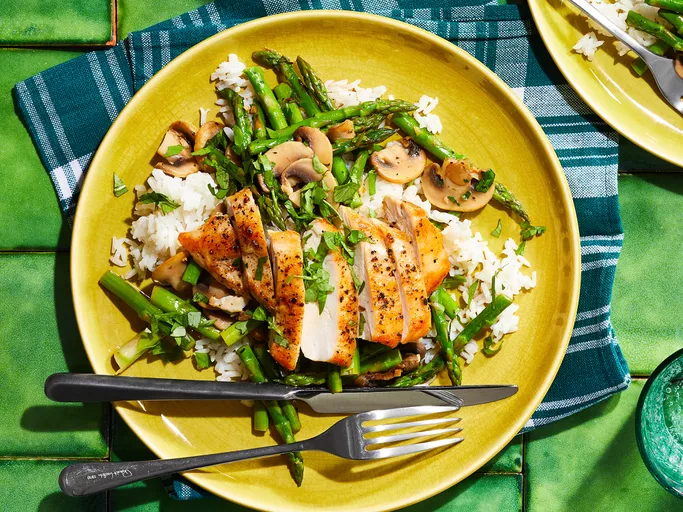
Garlic Butter Chicken, Asparagus, and Mushroom Skillet
Ingredients
Method
- Gather all ingredients. Slice the chicken breasts, trim the asparagus and cut it into thirds, and slice the mushrooms if needed.
- Place a large skillet over medium-high heat. Add the butter and olive oil, allowing the butter to melt completely.
- Stir the minced garlic, lemon juice, white cooking wine, dried parsley, dried basil, salt, and oregano into the warm butter and olive oil. Mix gently until the ingredients are well combined and fragrant.
- Add the sliced chicken breasts to the skillet. Cook for approximately 3 minutes, stirring occasionally, until the chicken begins to develop a golden-brown exterior.
- Turn the chicken pieces over and reduce the heat to medium. Continue cooking for approximately 10 minutes, stirring occasionally, until the chicken is no longer pink in the center. Check that the thickest pieces reach an internal temperature of 165°F (74°C).
- Add the prepared asparagus to the skillet. Cook and stir for approximately 3 minutes, until the asparagus turns bright green and begins to soften while retaining a slight crunch.
- Add the sliced mushrooms and stir them into the chicken and asparagus. Cook for approximately 3 more minutes, until the mushrooms soften and release their natural juices.
- Gently toss everything together to coat the chicken and vegetables with the garlic butter sauce.
- Serve immediately over cooked rice or pasta, spooning the remaining skillet sauce over each portion.
Notes
- Additional mushrooms can be added if you prefer a more vegetable-forward dish.
- Serve over rice or pasta to make the most of the garlic butter sauce.
- A glass of white wine can be served alongside the finished meal if desired.
- Cooking times may vary depending on the thickness of the chicken slices and asparagus.
- Different published versions of this recipe may have slight variations. Follow the instructions provided for the version you are preparing.
A good skillet dinner doesn’t need a long ingredient list or a complicated sauce. This chicken, asparagus, and mushroom combination uses a handful of everyday ingredients to create a fresh, savory meal with plenty of flavor.
The chicken cooks in a buttery garlic and herb mixture, while the asparagus adds a slightly crisp texture and the mushrooms bring an earthy richness. A little lemon juice and white cooking wine balance the butter, giving the dish a lighter, brighter finish.
Here’s what makes this recipe worth adding to your dinner rotation:
- One-pan convenience: The chicken, vegetables, and sauce come together in the same skillet, keeping cleanup simple.
- A flavorful garlic butter sauce: Butter, olive oil, garlic, herbs, and lemon juice create a savory coating for the chicken and vegetables.
- Tender chicken and fresh vegetables: The asparagus retains a little bite, while the mushrooms soften and absorb the skillet flavors.
- Easy to serve different ways: Pair it with rice, pasta, or another simple side depending on what you have available.
- A practical small-batch dinner: The recipe makes two servings and can be scaled up for additional portions.
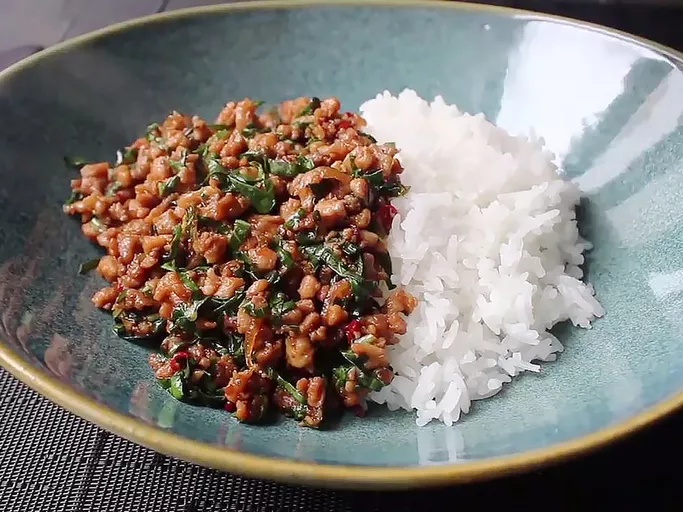
Spicy Thai Basil Chicken (Pad Krapow Gai) – Easy 25-Minute Dinner
Ingredients
Method
- Gather and prepare all ingredients before cooking. Finely chop the chicken thighs, slice the shallots, mince the garlic and chilies, and thinly slice the fresh basil leaves.
- In a small bowl, combine the chicken broth, oyster sauce, soy sauce, fish sauce, white sugar, and brown sugar. Whisk until the sugars dissolve and the sauce ingredients are evenly blended. Set aside.
- Place a large skillet over high heat and add the vegetable oil. Allow the oil to heat until shimmering.
- Add the finely chopped chicken to the hot skillet. Stir-fry for approximately 2–3 minutes, breaking up larger pieces and stirring frequently until the chicken loses its raw color.
- Add the sliced shallots, minced garlic, and chilies. Continue stir-frying over high heat for another 2–3 minutes, until the aromatics become fragrant and the chicken juices begin to caramelize on the bottom of the skillet.
- Pour approximately 1 tablespoon of the prepared sauce into the skillet. Stir continuously for about 1 minute, allowing the sauce to bubble and begin caramelizing around the chicken.
- Add the remaining sauce mixture. Stir well, scraping the bottom of the skillet to release the browned, flavorful bits.
- Continue cooking for approximately 1–2 minutes, stirring frequently, until the sauce reduces and forms a glossy coating around the chicken. Make sure the chicken is fully cooked to an internal temperature of 165°F (74°C).
- Remove the skillet from the heat. Add the thinly sliced basil and stir for approximately 20 seconds, just until the leaves wilt and release their aroma.
- Divide the hot cooked rice between two serving bowls or plates. Spoon the spicy Thai basil chicken over the rice and serve immediately.
Notes
- Regular sweet basil can replace Thai basil or holy basil, although each variety has a different flavor. Holy basil provides a more traditional flavor for Pad Krapow Gai.
- Finely chopping or grinding the chicken thighs yourself is recommended for better control over texture.
- Prepare and measure all ingredients before heating the skillet because the stir-frying process moves quickly.
- Thai chilies, Serrano chilies, or other hot peppers can be used. Adjust the quantity according to your preferred spice level.
- Maintain sufficiently high heat to help the sauce reduce into a glaze, but stir frequently to prevent the sugars and garlic from burning.
- If serving with freshly cooked rice, prepare it in advance or coordinate its cooking time so the rice and chicken are ready together.
Thai basil chicken is the kind of dinner that delivers big flavor without a long cooking process. The combination of garlic, fresh chilies, savory sauces, and fragrant basil creates a satisfying balance of heat, saltiness, and subtle sweetness.
What makes this dish particularly appealing is the way the sauce cooks down around the chicken. Instead of remaining thin and watery, it reduces over high heat and coats the meat with a glossy, intensely flavored glaze.
Here’s why this recipe deserves a place in your weeknight dinner rotation:
- Ready in just 25 minutes: Once everything is prepared, the actual stir-frying takes only about 10 minutes.
- Bold, balanced flavor: Oyster sauce, soy sauce, fish sauce, and a touch of sugar create a savory glaze that complements the spicy chilies.
- Fresh basil makes a difference: Adding basil at the end preserves its aroma and gives the finished dish a fresh, herbal finish.
- Simple cooking equipment: A large skillet and a small mixing bowl are all you need for the chicken mixture.
- Easy to customize the heat: You can reduce or increase the chilies depending on your spice tolerance.
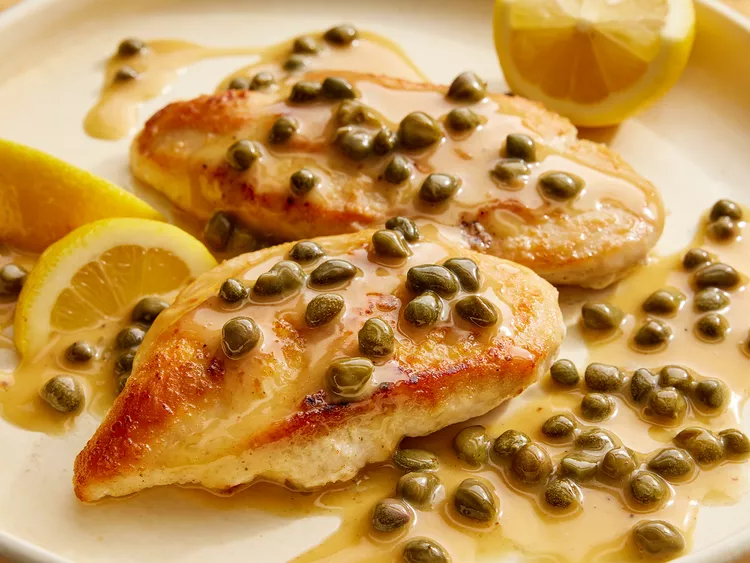
Chicken with Lemon-Caper Butter Sauce – Easy 30-Minute Skillet Dinner
Ingredients
Method
- In a shallow dish or resealable plastic bag, combine the all-purpose flour and salt. Mix until evenly distributed.
- Add the chicken breasts and coat both sides with the flour mixture. Shake off any excess flour to leave a thin, even coating.
- Heat the olive oil in a large skillet over medium-high heat. Once hot, add the chicken breasts and cook for approximately 3–4 minutes per side, until golden brown and cooked through. The internal temperature should reach 165°F (74°C). Thicker pieces may require additional cooking time.
- Transfer the cooked chicken to a plate. Cover loosely to keep warm while preparing the sauce.
- Carefully pour the dry white wine into the same skillet. Bring it to a boil, scraping the bottom of the pan with a wooden spoon or spatula to release the flavorful browned bits.
- Add the lemon juice and continue boiling for approximately 2–3 minutes, until the liquid reduces by about half.
- Add the cold butter pieces gradually to the bubbling sauce. Continuously swirl and shake the skillet to incorporate the butter as it melts, creating a smooth, slightly thickened sauce. Keep the butter moving to prevent the sauce from separating.
- Once the butter is completely incorporated and the sauce has thickened, remove the skillet from the heat.
- Stir in the drained capers until evenly distributed throughout the sauce.
- Place the chicken breasts on serving plates and spoon the warm lemon-caper butter sauce over the top. Garnish with lemon wedges and serve immediately.
Notes
- Keep the cooked chicken covered and warm while preparing the sauce.
- Use cold butter cut into smaller pieces so it incorporates gradually and evenly.
- Continuously swirl and shake the skillet while adding butter. Allowing the butter to sit without movement may cause the sauce to separate and become oily.
- Remove the sauce from the heat before stirring in the drained capers.
- Serve immediately with the lemon-caper sauce and fresh lemon wedges.
- Chicken thickness may affect cooking time. Always check that the thickest portion reaches 165°F (74°C).
Some chicken dinners feel special because of their presentation, but the real appeal of this dish is its sauce. A combination of lemon juice, white wine, and cold butter transforms the flavorful bits left in the skillet into a smooth, rich coating for golden chicken breasts.
Capers add small bursts of tangy, salty flavor that balance the butter and brighten every bite.
The result is a restaurant-style chicken dinner made with a short ingredient list and a straightforward cooking method.
- Rich, bright flavor: Lemon juice adds freshness, while butter and white wine create a silky sauce that complements the chicken.
- Beautiful golden chicken: A light flour coating helps the chicken develop an appealing color and delicate exterior.
- One-skillet preparation: The chicken and sauce cook in the same pan, allowing the browned bits from the chicken to flavor the sauce.
- Perfect for smaller meals: With two servings, this recipe works well for a date-night dinner or a meal for two.
- Simple but elegant: The glossy lemon butter sauce and tangy capers make everyday chicken breasts feel more special without complicated preparation.

Baked Sweet and Sour Chicken Thighs with Pineapple – Easy 30-Minute Dinner
Ingredients
Method
- Preheat the oven to 400°F (200°C). Lightly grease a baking dish or coat it with cooking spray to prevent sticking.
- Pat the boneless chicken thighs dry with paper towels. Cut the chicken into approximately 1-inch pieces and place them in the prepared baking dish.
- Sprinkle the cornstarch over the chicken. Toss gently until the pieces are evenly coated. This helps the sauce cling to the chicken as it cooks.
- Add the bite-sized onion pieces, green bell pepper, red bell pepper, and pineapple chunks to the baking dish. Stir gently to distribute the vegetables and fruit around the chicken.
- In a small mixing bowl, combine the ketchup, seasoned rice vinegar, brown sugar, low-sodium soy sauce, minced garlic, and ginger paste. Whisk until the brown sugar is incorporated and the sauce is smooth.
- Pour the sweet and sour sauce over the chicken, pineapple, and vegetables. Stir until everything is evenly coated.
- Place the baking dish in the preheated oven and bake for approximately 14–17 minutes, stirring halfway through to distribute the sauce and promote even cooking.
- Check that the chicken is fully cooked and no longer pink in the center. An instant-read thermometer inserted into the thickest chicken pieces should register at least 165°F (74°C).
- If the sauce becomes thicker than desired, add a small splash of water and stir until it reaches your preferred consistency.
- Remove the baking dish from the oven. Garnish with sliced green onion, if using, and serve the sweet and sour chicken hot.
Notes
- Ginger paste is commonly sold in tubes in the refrigerated produce section of grocery stores.
- If ginger paste is unavailable, substitute ¼ teaspoon ground ginger powder. Fresh ginger root paste is preferred for its brighter flavor.
- The recipe can be doubled when preparing additional servings. Use a baking dish large enough to avoid overcrowding.
- Adjust the brown sugar to taste depending on your preferred balance of sweetness and tanginess.
- Baking time may vary depending on the size of the chicken pieces and the depth of the baking dish. Always confirm that the chicken reaches 165°F (74°C).
- Add a splash of water if the finished sauce is too thick.
Sweet and sour chicken is known for its combination of tangy sauce, tender chicken, colorful vegetables, and juicy pineapple. This oven-baked version brings those familiar flavors together without the extra steps of coating and deep-frying the chicken.
Instead of working with multiple pans, everything goes into a single baking dish. The chicken cooks in the sauce alongside the vegetables and pineapple, allowing the flavors to blend as the sauce thickens.
It’s a practical choice when you want a flavorful dinner without spending too much time at the stove.
- No deep-frying required: The chicken bakes directly in the sauce, making preparation simpler and avoiding the mess of frying.
- A balanced sweet and tangy sauce: Ketchup, rice vinegar, brown sugar, and soy sauce create a familiar sweet and sour flavor with savory depth.
- Juicy chicken thighs: Boneless thighs remain tender as they bake with the pineapple and vegetables.
- Everything cooks together: The chicken, peppers, onions, pineapple, and sauce share one baking dish for easier cleanup.
- Easy to adjust: The sweetness, vegetables, and serving options can be adapted to suit your preferences.

Easy Blackened Chicken Breast with a Bold, Smoky Spice Crust
Ingredients
Method
- Gather all ingredients and preheat the oven to 350°F (175°C). Lightly coat a baking sheet with cooking spray and set aside.
- Place a cast iron skillet over high heat. Allow it to heat for approximately 3–5 minutes, until smoking hot. Make sure the kitchen is well ventilated.
- While the skillet heats, combine the paprika, cayenne pepper, ground cumin, dried thyme, onion powder, ground white pepper, and salt in a small bowl. Stir until the spices are evenly mixed.
- Lightly spray both sides of the chicken breasts with cooking spray. Sprinkle the spice mixture evenly over the chicken, coating both sides.
- Carefully place the seasoned chicken breasts into the hot cast iron skillet. Sear for approximately 1 minute without moving them, allowing a dark, flavorful crust to develop.
- Turn the chicken breasts and sear the opposite side for another minute.
- Transfer the seared chicken to the prepared baking sheet.
- Place the baking sheet in the preheated oven and bake for approximately 5–10 minutes, or until the chicken is fully cooked. An instant-read thermometer inserted into the thickest part should register at least 165°F (74°C). Thicker chicken breasts may require additional baking time.
- Remove the chicken from the oven and serve hot with your preferred side dishes.
Notes
- Adjust the cayenne pepper and other spices according to your preferred heat level.
- The chicken is briefly seared in a very hot cast iron skillet to create its characteristic dark, seasoned exterior before finishing in the oven.
- Use proper ventilation when searing because the high cooking temperature can generate smoke.
- Baking time varies depending on the thickness of the chicken breasts. Always check for an internal temperature of 165°F (74°C).
- Serve with fresh corn and mashed potatoes for a simple, satisfying meal.
Blackened chicken is a great option when you want plenty of flavor without making a complicated marinade or sauce. A simple mixture of pantry spices creates a bold coating that transforms ordinary chicken breasts into something much more exciting.
The cooking method makes this recipe especially appealing. A quick sear in a hot cast iron skillet develops the signature dark crust, while finishing the chicken in the oven helps cook the center without leaving it on the intense skillet heat for too long.
It’s a practical way to prepare flavorful chicken for dinner, salads, sandwiches, or meal prep.
- Bold seasoning: Paprika, cayenne, cumin, and herbs create a savory, slightly spicy crust.
- Quick cooking: The combination of stovetop searing and oven finishing makes this a convenient dinner.
- No marinating required: The seasoning is applied immediately before cooking, so there’s no need to plan hours ahead.
- Easy to adjust: You can make the chicken milder or spicier by changing the amount of cayenne pepper.
- Versatile serving options: The finished chicken works with potatoes, vegetables, rice, salads, and more.
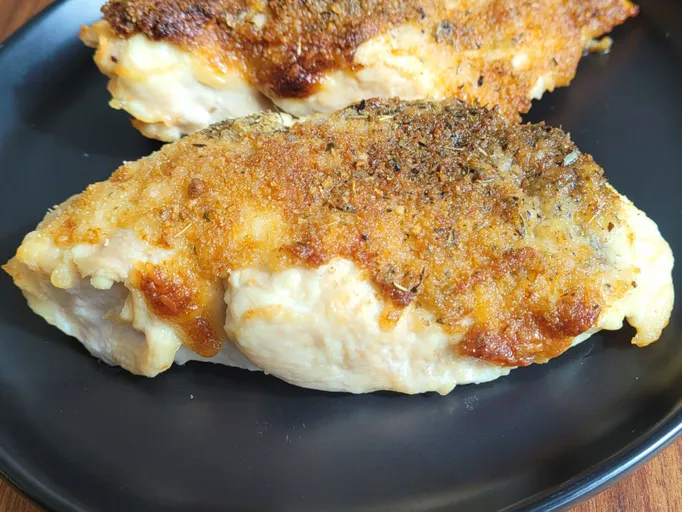
Easy Baked Mayo Parmesan Chicken with Crispy Bread Crumbs
Ingredients
Method
- Preheat the oven to 425°F (220°C). Have a baking pan ready for the chicken.
- Arrange the boneless, skinless chicken breasts in the baking pan, leaving a little space between them for even cooking.
- In a small mixing bowl, combine the grated Parmesan cheese and mayonnaise. Stir until the mixture is smooth and evenly blended.
- Spread the mayonnaise and Parmesan mixture evenly over the top of each chicken breast, covering the surface with a generous layer.
- Sprinkle the bread crumbs over the coated chicken, distributing them evenly to create a light, textured topping.
- Finish by sprinkling the herbes de Provence over the bread crumbs, making sure both chicken breasts are evenly seasoned.
- Place the baking pan in the preheated oven and bake for approximately 20–25 minutes, until the topping is lightly golden and the chicken is fully cooked.
- Check the thickest part of each chicken breast with an instant-read thermometer. The internal temperature should reach at least 165°F (74°C).
- Remove the chicken from the oven and serve warm with your favorite side dishes.
Notes
- Italian seasoning can replace herbes de Provence if needed.
- The mayonnaise topping helps retain moisture while the chicken bakes.
- Parmesan cheese and bread crumbs work together to create a flavorful, lightly crisp topping.
- Additional mayonnaise or bread crumbs can be added according to your preference, although this may change the topping’s texture.
- Baking time may vary depending on the thickness of the chicken breasts. Always confirm an internal temperature of 165°F (74°C).
Chicken breast can sometimes turn out dry in the oven, especially when it’s cooked without a sauce or protective coating. This recipe offers a simple solution: a creamy layer of mayonnaise and Parmesan that covers the chicken while it bakes.
The mayonnaise helps reduce moisture loss, while the Parmesan adds a salty, savory flavor. A sprinkle of bread crumbs creates a lightly crisp topping, and herbes de Provence brings everything together with a fragrant herbal finish.
The best part is that you don’t need to brown the chicken first or prepare a separate sauce.
- Only five ingredients: Everything you need is simple and easy to prepare, with no complicated seasoning blend or marinade.
- Tender, moist chicken: The creamy mayonnaise topping helps protect the chicken breast from drying out during baking.
- A flavorful Parmesan crust: Bread crumbs and grated cheese create a satisfying contrast between the tender meat and lightly crisp topping.
- Minimal preparation: Just mix, spread, sprinkle, and bake. There’s no need for a stovetop cooking step.
- Easy to pair with sides: The savory, herb-seasoned chicken works well with vegetables, potatoes, pasta, or a fresh salad.
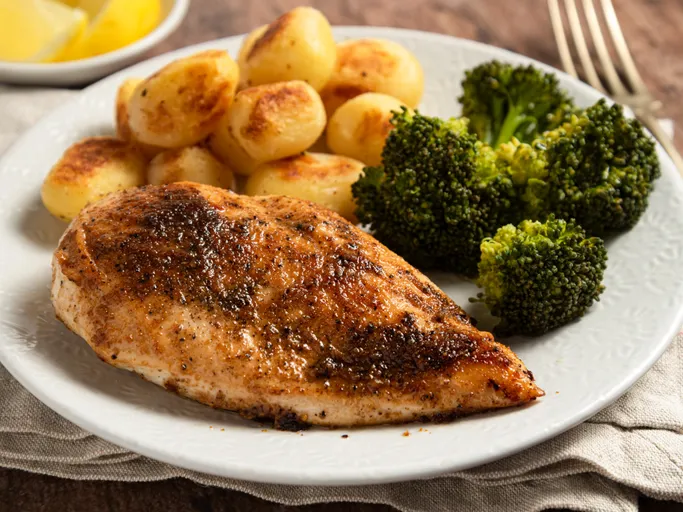
Easy Lemon Garlic Chicken Breast – Juicy 25-Minute Skillet Dinner
Ingredients
Method
- Gather all ingredients. Juice the lemon and set the juice aside. Season both sides of the chicken breasts with salt and ground black pepper.
- Place a large skillet over medium-high heat. Add the butter and allow it to melt completely, coating the bottom of the pan.
- Carefully place the seasoned chicken breasts into the melted butter. Cook for approximately 5 minutes, turning frequently, until the chicken begins developing a golden-brown exterior.
- Sprinkle 1 tablespoon of garlic powder evenly over the chicken. Continue cooking for approximately 2 minutes, allowing the seasoning to coat the surface.
- Turn the chicken breasts over and sprinkle the remaining 1 tablespoon of garlic powder over the opposite sides. Cook for another 2 minutes.
- Pour the freshly squeezed lemon juice over both sides of the chicken, turning the pieces to distribute the juice evenly.
- Continue cooking for approximately 5–10 minutes, turning occasionally, until the chicken is fully cooked and no longer pink in the center. An instant-read thermometer inserted into the thickest part should register at least 165°F (74°C).
- Remove the chicken from the skillet and serve hot, spooning any remaining lemon butter juices over the top.
Notes
- Garlic powder is added in two stages, with 1 tablespoon sprinkled over each side of the chicken.
- Adjust the salt and black pepper according to your preferred seasoning level.
- Use freshly squeezed lemon juice for a bright citrus flavor.
- The cooking time may vary depending on the thickness of the chicken breasts.
- Cook the chicken until its internal temperature reaches at least 165°F (74°C).
- If the butter or garlic seasoning begins browning too quickly, reduce the heat slightly to prevent burning.
A flavorful chicken dinner doesn’t always require a long ingredient list or a complicated sauce. Sometimes, a little butter, plenty of garlic seasoning, and fresh lemon juice are enough to turn ordinary chicken breasts into a satisfying meal.
This lemon garlic chicken cooks entirely in one skillet. The chicken develops a lightly browned exterior while the butter creates a rich cooking base. Garlic powder adds savory flavor, and a squeeze of lemon juice brings everything together with a fresh, tangy finish.
It’s especially useful for busy evenings when you want something homemade without spending too much time preparing dinner.
- Only six ingredients: The recipe relies on everyday staples, making it convenient when your refrigerator and pantry are running low.
- Quick skillet cooking: Everything comes together on the stovetop, with no oven or complicated preparation required.
- Bright, buttery flavor: Fresh lemon juice balances the richness of the butter and complements the garlic seasoning.
- Easy to serve: The chicken pairs well with rice, potatoes, pasta, roasted vegetables, or a fresh salad.
- Simple to customize: Adjust the salt, pepper, and lemon flavor according to your preferences.
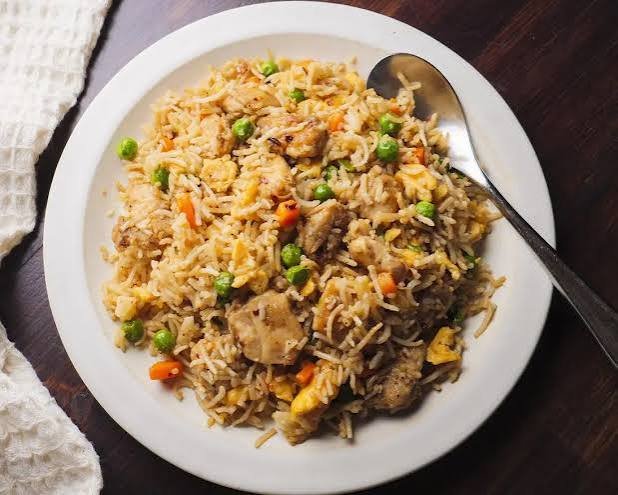
Easy Garlic Chicken Fried Brown Rice – Flavorful 35-Minute Dinner
Ingredients
Method
- Add the chicken strips, chopped red bell pepper, green onions, and minced garlic. Cook for approximately 5 minutes, stirring frequently, until the vegetables begin to soften and the chicken is fully cooked. The chicken should reach an internal temperature of 165°F (74°C).
- Transfer the cooked chicken and vegetable mixture to a plate. Set aside and keep warm while preparing the rice.
- Add the remaining 1 tablespoon of vegetable oil to the same skillet. Increase the heat to medium-high.
- Add the cooked brown rice, breaking apart any clumps with a spatula. Stir-fry until the rice is evenly heated and begins to develop a lightly toasted texture.
- Pour in the light soy sauce and rice vinegar. Add the thawed peas and stir continuously for approximately 1 minute, distributing the seasonings throughout the rice.
- Return the cooked chicken, bell pepper, green onion, and garlic mixture to the skillet.
- Stir everything together until the chicken and vegetables are evenly distributed throughout the rice. Continue cooking until thoroughly heated.
- Remove from the heat and serve immediately. Add black pepper, paprika, or dried parsley if desired.
Notes
- Leftover cooked brown rice works particularly well because refrigerated rice is generally firmer and less likely to become mushy during stir-frying.
- Black pepper, paprika, or dried parsley may be added after cooking for additional flavor.
- Frozen peas should be thawed before adding them to the skillet.
- The chicken and vegetable mixture is cooked first, then removed while the rice is stir-fried separately. Everything is combined before serving.
- Use a sufficiently large skillet to allow the rice to heat evenly.
- If using leftover rice, make sure it was cooled promptly and stored safely in the refrigerator before cooking.
Leftover rice doesn’t have to become another plain side dish. With a little garlic, tender chicken, and colorful vegetables, cooked brown rice can turn into a flavorful, satisfying dinner that requires very little complicated preparation.
This garlic chicken fried brown rice brings together savory soy sauce, mild rice vinegar, and plenty of fresh garlic. The brown rice adds a pleasantly chewy texture, while red bell pepper, green onions, and peas provide color and freshness.
Everything cooks in the same skillet, making it a convenient choice for busy evenings.
- Perfect for leftover rice: Previously cooked brown rice works especially well for fried rice because its firmer texture helps the grains stay separate.
- A satisfying meal: Chicken, rice, and vegetables come together in one dish, making it substantial enough for dinner.
- Plenty of garlic flavor: Fresh minced garlic gives the chicken and vegetables a savory aroma that carries throughout the rice.
- Simple skillet cooking: The ingredients cook in stages in the same pan, keeping cleanup manageable.
- Easy to customize: Different vegetables and optional seasonings can be added depending on what you have available.
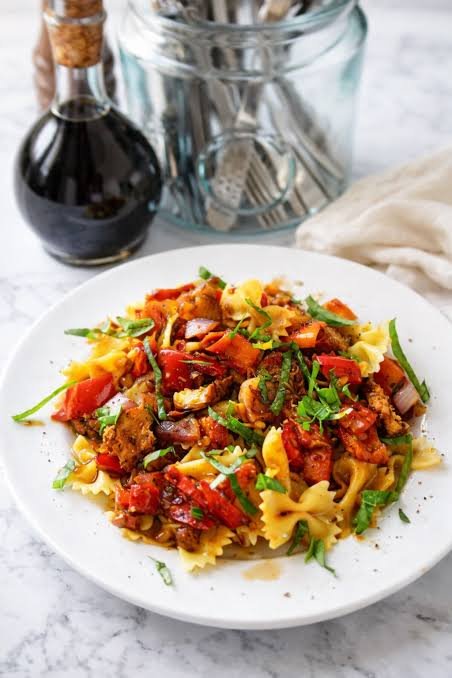
Quick Honey Balsamic Basil Chicken – Easy 20-Minute Skillet Dinner
Ingredients
Method
- Gather all ingredients. Chop the fresh basil and season the chicken tenderloin strips evenly with salt and freshly ground black pepper.
- Heat the olive oil in a large nonstick skillet over medium-high heat until hot.
- Add the seasoned chicken strips to the skillet. Cook for approximately 3–5 minutes, stirring and turning occasionally, until the chicken is lightly browned and no longer pink in the center.
- Check that the thickest chicken pieces reach an internal temperature of at least 165°F (74°C).
- Add the chopped fresh basil, honey, and balsamic vinegar to the cooked chicken.
- Stir continuously for approximately 1 minute, allowing the honey and balsamic vinegar to blend with the pan juices and lightly coat the chicken.
- Remove the skillet from the heat once the chicken is evenly coated and the basil becomes fragrant.
- Serve immediately with a fresh salad, cooked vegetables, or your preferred side dish.
Notes
- Fresh basil is important for achieving the bright, aromatic flavor of this recipe.
- Any cut of chicken can be used, but the cooking time should be adjusted according to the size and thickness of the pieces.
- Add a little extra balsamic vinegar if you prefer a more tangy flavor.
- The honey and balsamic vinegar create a light coating rather than a thick, heavy sauce.
- Serve with a fresh salad and your favorite vegetables for a quick weeknight dinner.
- Always cook chicken to an internal temperature of 165°F (74°C).
When dinner needs to be quick but you still want something flavorful, this honey balsamic basil chicken is an excellent option. It uses a handful of simple ingredients to create a balanced combination of sweet, tangy, and fresh flavors.
The chicken cooks quickly in a skillet, while honey and balsamic vinegar form a light glaze that coats each piece. Fresh basil is added near the end, giving the dish a fragrant finish that makes it taste fresh and vibrant.
Unlike recipes that require long marinades or complicated sauces, this one comes together with very little preparation.
- Ready in 20 minutes: The chicken cooks quickly, making this a convenient choice for busy evenings.
- Only seven ingredients: You don’t need a long shopping list or specialty cooking equipment.
- Sweet and tangy flavor: Honey balances the acidity of balsamic vinegar, creating a simple glaze without overpowering the chicken.
- Fresh basil aroma: Chopped basil adds a bright herbal flavor that complements the sweet-and-sour coating.
- Flexible serving options: Serve the chicken with rice, roasted vegetables, pasta, or a fresh salad.