
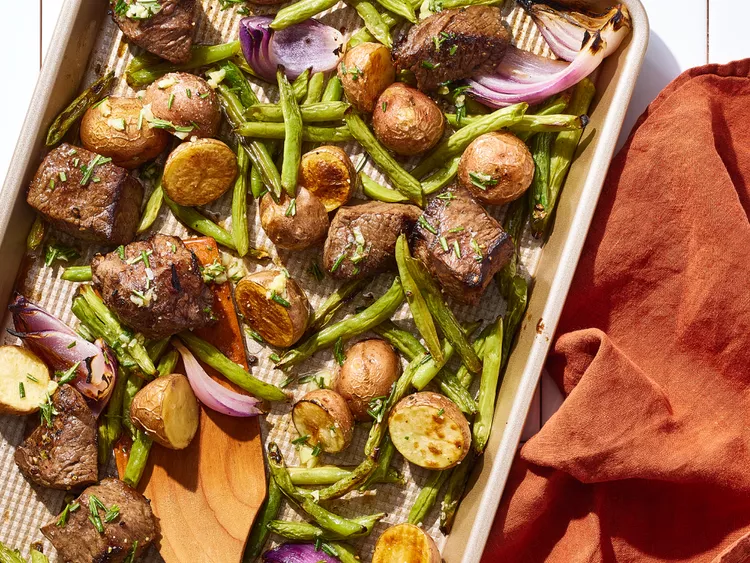
Garlic Butter Steak Bites with Roasted Vegetables (Sheet Pan Dinner)
Ingredients
Method
- Place an oven rack about 6 inches from the heat source. Preheat the oven to 450°F (230°C). Lightly coat a 10×15-inch baking sheet with cooking spray.
- In a medium bowl, toss potatoes, green beans, and red onion with 1 tablespoon olive oil, ¼ teaspoon kosher salt, and ¼ teaspoon black pepper.
- Spread the vegetables evenly across the prepared baking sheet.
- Roast the vegetables in the oven for 15 minutes, stirring halfway through, until the potatoes begin to soften and the vegetables develop roasted edges.
- While the vegetables cook, toss steak pieces with Worcestershire sauce, the remaining 1 tablespoon olive oil, ½ teaspoon kosher salt, and ¼ teaspoon black pepper.
- Preheat the broiler. Push the roasted vegetables toward the edges of the baking sheet and arrange the steak pieces in a single layer in the center.
- Broil the steak, turning halfway through, until cooked to your preferred doneness. For medium steak, the internal temperature should reach about 140–145°F (60–63°C), which usually takes 6–8 minutes.
- Meanwhile, melt butter in a small saucepan over medium heat. Add grated garlic and cook for about 30 seconds until fragrant. Remove from heat and stir in rosemary or parsley.
- Drizzle the garlic butter over the steak and vegetables before serving.
Notes
- This recipe uses one sheet pan to cook the steak, potatoes, green beans, and onion together for easy cleanup.
- Roasting the vegetables first gives the potatoes enough time to become tender before the steak is added.
- Steak doneness can be adjusted based on your preference.
- Add the garlic butter after cooking to preserve the fresh garlic and herb flavor.
- A meat thermometer is the most reliable way to check steak doneness.
When you need a satisfying dinner with minimal cleanup, sheet pan meals are hard to beat. This garlic butter steak bites recipe brings together juicy steak, roasted vegetables, and a flavorful herb butter finish all on one pan.
Instead of preparing separate dishes for protein and sides, everything comes together in a simple oven-to-table meal.
Here are a few reasons this recipe works so well:
- Complete meal in one pan: Steak, potatoes, and vegetables cook together for a balanced dinner.
- Fast preparation: With only a short prep time and quick cooking process, this meal is ready in about 30 minutes.
- Rich garlic butter flavor: The finishing butter adds a savory, aromatic touch without making the dish heavy.
- Perfect texture combination: Crispy roasted potatoes, tender vegetables, and juicy steak create a satisfying contrast.
- Easy cleanup: Cooking everything on one sheet pan means fewer dishes after dinner.
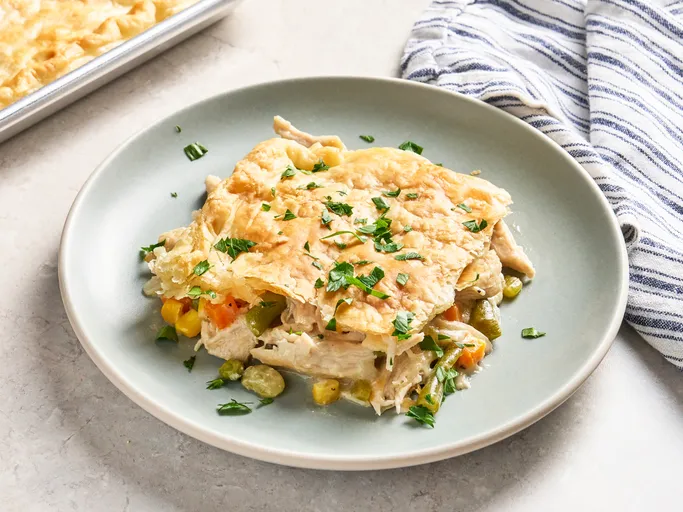
Sheet Pan Chicken Pot Pie with Flaky Puff Pastry
Ingredients
Method
- Preheat the oven to 400°F (200°C).
- Melt butter in a large skillet over medium heat. Add chopped onion and celery, then cook for about 5 minutes until softened.
- Season the vegetables with salt, black pepper, and garlic powder. Stir in flour and cook for 1 minute to remove the raw flour taste.
- Gradually whisk in chicken broth and heavy cream until the mixture is smooth. Continue cooking until the sauce thickens into a creamy consistency.
- Add chopped cooked chicken and frozen mixed vegetables. Stir until everything is evenly combined and heated through.
- Transfer the creamy chicken mixture to a sheet pan and spread it into an even layer.
- Place puff pastry sheets over the filling, trimming or overlapping the edges as needed. Cut several slits into the pastry to allow steam to escape.
- Bake for about 30 minutes, until the puff pastry is golden brown and the filling is bubbling.
- Allow the pot pie to cool slightly before serving.
Notes
- This recipe uses a sheet pan instead of a traditional pie dish, making it ideal for serving a larger group.
- Cooked chicken makes preparation faster and easier.
- Frozen mixed vegetables can be added directly to the creamy filling.
- Cut slits in the puff pastry before baking to allow steam to escape and help the pastry cook evenly.
- Letting the pot pie rest briefly after baking helps the filling thicken slightly before serving.
Chicken pot pie is a classic comfort food known for its creamy filling, tender chicken, and flaky crust. This sheet pan version keeps all the familiar flavors while making the dish easier to prepare and serve.
Instead of baking individual pies or using a deep pie dish, this recipe spreads the filling across a sheet pan and tops it with buttery puff pastry for a beautiful golden finish.
Here are a few reasons this version stands out:
- Perfect for feeding a crowd: A large sheet pan creates plenty of servings for family dinners or gatherings.
- Flaky puff pastry topping: The pastry becomes crisp and golden while covering the creamy filling underneath.
- Easy preparation: Using cooked chicken and frozen vegetables saves time without sacrificing comfort.
- Rich and creamy filling: A homemade sauce made with butter, broth, and cream creates the classic pot pie texture.
- Great use for leftover chicken: It is an excellent way to turn cooked chicken into a satisfying meal.
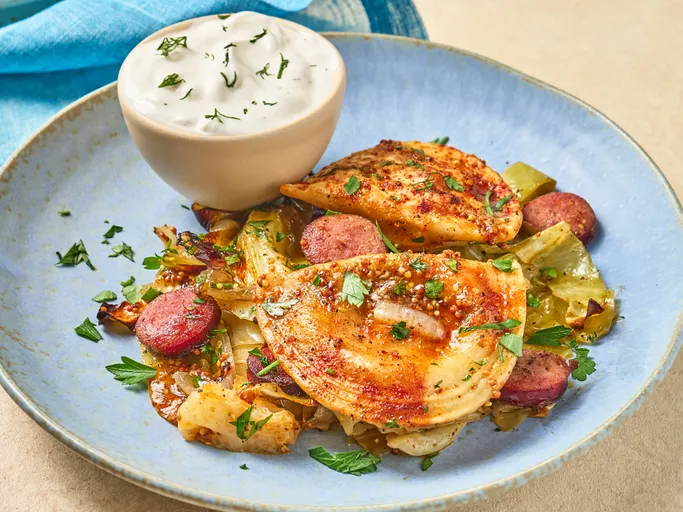
Pierogi Sausage Sheet Pan Dinner with Kielbasa and Cabbage
Ingredients
Method
- Preheat the oven to 425°F.
- Arrange sliced kielbasa sausage, cabbage, onion, and frozen pierogies evenly on a sheet pan.
- Season the ingredients with salt and black pepper as desired.
- Roast until the pierogies become golden and crisp and the cabbage and onions are tender, about 40 minutes.
- While the sheet pan dinner cooks, prepare the vinaigrette by whisking together honey, Cajun seasoning, whole grain mustard, red wine vinegar, oil, and paprika until combined.
- Remove the sheet pan from the oven and drizzle the vinaigrette over the roasted ingredients.
- Toss gently to coat everything with the dressing.
- Garnish with fresh parsley and dill.
- Serve warm with sour cream on the side.
Notes
- Frozen pierogies can be cooked directly on the sheet pan without thawing first.
- The roasting process gives the pierogies a golden exterior while softening the cabbage and onion.
- The mustard vinaigrette adds a sweet, tangy flavor that balances the richness of the sausage and pierogi.
- Fresh dill, parsley, and sour cream provide a traditional finishing touch.
- Arrange ingredients in a single layer when possible to encourage better browning.
If you enjoy comforting meals with bold flavors and simple preparation, this pierogi sausage sheet pan dinner is a recipe worth adding to your rotation.
It brings together classic Polish-inspired ingredients like pierogi, kielbasa, and cabbage in an easy one-pan format. Everything roasts together until the sausage is flavorful, the vegetables are tender, and the pierogi develop delicious golden edges.
Here are a few reasons this dinner works so well:
- One-pan convenience: Everything cooks together on a single sheet pan for easy preparation and cleanup.
- Comforting flavors: Kielbasa, pierogi, cabbage, and sour cream create a satisfying combination.
- Minimal prep work: Frozen pierogi and simple vegetables make this meal quick to assemble.
- Perfect balance of flavors: The sweet and tangy mustard vinaigrette cuts through the richness of the sausage and potatoes.
- Great family dinner: A large sheet pan makes enough for sharing.
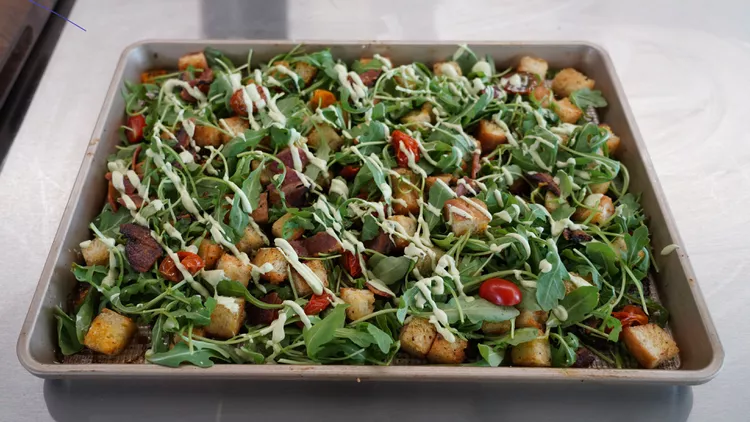
Sheet Pan BLT Salad with Crispy Bacon, Tomatoes, and Avocado Mayo
Ingredients
Method
- Preheat the oven to 400°F.
- Arrange bacon slices on a sheet pan and bake until crispy. Remove the bacon and set aside, leaving the bacon drippings on the pan.
- Add bread cubes and cherry tomatoes to the sheet pan. Toss them with the bacon drippings, salt, and black pepper until evenly coated.
- Bake until the bread becomes crisp and golden and the tomatoes soften and roast.
- While the bread and tomatoes cook, prepare the avocado mayo by blending avocado, mayonnaise, lemon juice, garlic, salt, and pepper until smooth and creamy.
- Add arugula to a large bowl and combine with the roasted bread cubes and tomatoes.
- Crumble the crispy bacon over the salad.
- Drizzle with avocado mayo and toss gently before serving.
Notes
- The bacon drippings are used to flavor the bread cubes and tomatoes during roasting.
- Roasting the cherry tomatoes adds sweetness and depth to the salad.
- Sourdough bread provides a sturdy, crunchy texture that holds up well with the dressing.
- The avocado mayo creates a creamy alternative to traditional BLT-style toppings.
- Add the dressing just before serving for the best texture.
The classic BLT is loved for a simple reason: crispy bacon, juicy tomatoes, and fresh greens create a perfect balance of salty, fresh, and savory flavors.
This sheet pan BLT salad takes those familiar ingredients and gives them a delicious upgrade. Instead of a traditional sandwich, the ingredients are transformed into a hearty salad with crunchy roasted bread cubes, warm tomatoes, crispy bacon, and a creamy avocado dressing.
Here are a few reasons this salad stands out:
- A complete meal-style salad: Bacon, bread, vegetables, and creamy dressing make it filling enough for lunch or a light dinner.
- Big flavor from simple ingredients: Roasted tomatoes and bacon drippings add extra depth.
- Great texture combination: Crisp bacon, crunchy bread, creamy dressing, and fresh greens create variety in every bite.
- Easy sheet pan preparation: The oven handles the bacon, bread, and tomatoes together.
- A creative twist on a classic: It keeps the flavors of a BLT while offering something new.
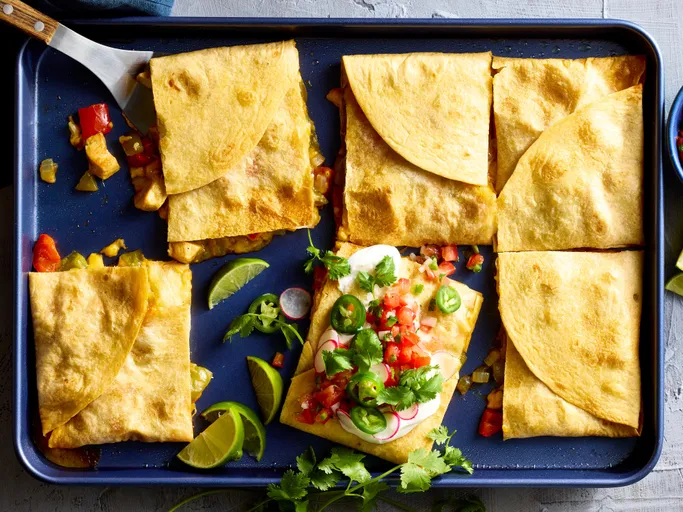
Crispy Chicken Sheet Pan Quesadillas with Peppers and Cheese
Ingredients
Method
- Preheat the oven to 425°F (220°C).
- Heat olive oil in a large skillet over medium-high heat. Add chicken pieces and cook until browned and fully cooked.
- Add fajita seasoning, chopped onion, green bell pepper, and red bell pepper. Cook until the vegetables soften and the chicken mixture is well combined.
- Arrange flour tortillas on a large sheet pan, overlapping them slightly so they cover the surface while leaving some tortilla edges hanging over the sides.
- Spread the chicken and vegetable mixture evenly over the tortillas.
- Sprinkle the shredded Mexican cheese blend over the filling.
- Fold the overhanging tortilla edges over the filling to enclose the quesadilla. Add additional tortillas on top if needed to fully cover the filling.
- Place a second sheet pan on top to press the quesadilla down.
- Bake for about 25 minutes, until the tortillas are golden and crispy and the cheese is melted.
- Remove the top sheet pan, cut into portions, and serve with sour cream, pico de gallo, and fresh cilantro.
Notes
- The second sheet pan helps press the tortillas together and creates an evenly crisp exterior.
- The chicken filling can be prepared ahead of time for faster assembly.
- Use tortillas that are large enough to overlap across the sheet pan.
- Mexican cheese blend melts well, but other melting cheeses can also work.
- Serve immediately for the best crispy texture.
Traditional quesadillas are delicious, but making them one at a time can be difficult when feeding a group. These sheet pan quesadillas solve that problem by turning the classic handheld meal into a large, oven-baked version that can be sliced and shared.
Instead of standing over a skillet making individual quesadillas, everything comes together on one sheet pan with a crispy tortilla crust, flavorful chicken filling, and plenty of melted cheese.
Here are a few reasons this recipe is a great choice:
- Perfect for groups: One large quesadilla can be sliced into multiple servings, making it ideal for family dinners or parties.
- Crispy texture: Baking under a second sheet pan helps create golden, crunchy tortillas.
- Easy preparation: The chicken and vegetable filling comes together quickly before baking.
- Customizable filling: Add your favorite taco-style ingredients to make it your own.
- Less hands-on cooking: The oven does most of the work after assembly.