Halloween Cake Pops (Easy Donut Hole Shortcut)
Easy Halloween cake pops made with donut holes, colorful candy melts, and spooky decorations for a quick festive treat.
Keep the screen of your device on
Ingredients
For the Cake Pops
1 cup candy melts (green, purple and/or orange)
24 6- to 7-inch lollipop sticks
24 plain mini donuts and/or donut holes
For Decoration
Candy eyeballs
Assorted sprinkles
Black decorating gel
Instructions
- Melt candy melts according to package directions.
- Dip each lollipop stick 1/4 to 1/2 inch into melted candy coating.
- Insert sticks into donut holes.
- Allow donuts to cool upside down on wax paper until coating hardens.
- Dip each donut hole into melted candy coating until fully covered.
- Allow excess coating to drip off.
- Place pops upside down on parchment paper and let coating harden completely.
- Decorate with candy eyes, sprinkles, drizzle, or decorating gel.
- Allow decorations to set before serving.
Notes
- Avoid candy melts with a white film inside the package.
- If coating becomes too thick, add a small amount of oil to loosen it.
- Store cake pops at room temperature for best results.
- Nutritional Information Disclaimer:
Nutrition information is an estimate and may vary depending on the ingredients and quantities used.
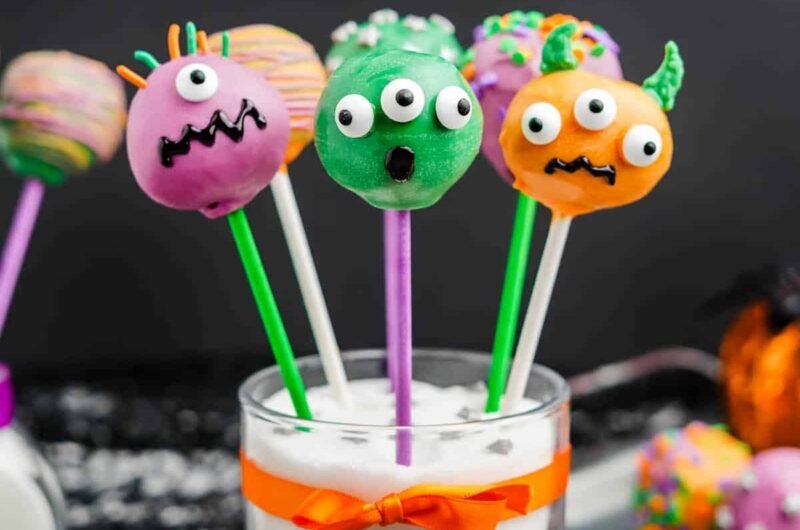
These Halloween Cake Pops With Donut Holes are a quick and creative way to make spooky treats without the traditional cake-and-frosting method. Instead of baking a cake, crumbling it, and mixing it with frosting, this recipe uses ready-made donut holes coated in colorful candy melts and decorated with Halloween-inspired designs.
The result is a fun handheld dessert with a smooth candy coating, sweet donut center, and endless decorating possibilities. From monster faces and ghost designs to colorful sprinkles, these cake pops are easy to customize for Halloween parties, school treats, or festive dessert tables.
Recipe at a Glance
Prep Time: 30 minutes
Cool Time: 10 minutes
Total Time: 40 minutes
Yield: 24 servings
Course: Dessert
Cuisine: American
Calories: 166 kcal
Why You’ll Love This Recipe
These Halloween cake pops are designed for simple preparation and creative decorating.
The donut hole shortcut removes the need for baking and shaping cake balls.
The candy coating creates a smooth colorful finish that works well for Halloween designs.
They are easy to customize with different colors, sprinkles, and decorations.
The individual serving size makes them convenient for parties and gatherings.
The recipe is beginner-friendly and does not require advanced decorating skills.
Ingredients You’ll Need
For the Cake Pops
1 cup candy melts (green, purple and/or orange)
24 6- to 7-inch lollipop sticks
24 plain mini donuts and/or donut holes
For Decoration
Candy eyeballs
Assorted sprinkles
Black decorating gel
Easy Substitutions
Donut Holes
Plain mini donuts or donut holes can be used depending on what is available. The size and shape may slightly affect the final appearance.
Candy Melts
Different candy melt colors can be used to match your Halloween theme. Orange, purple, green, white, and black are common choices for spooky designs.
Decorating Supplies
Candy eyes, sprinkles, and decorating gel can be changed depending on the designs you want to create.
How to Make Halloween Cake Pops With Donut Holes
Step 1: Melt the Candy Coating
Melt the candy melts according to the package directions.
The coating should be smooth and easy to dip. If the candy coating becomes too thick, it may be difficult to cover the donut holes evenly.
Step 2: Prepare the Sticks
Dip about 1/4 to 1/2 inch of each lollipop stick into the melted candy coating.
Insert the coated end into each donut hole.
Allow the pops to cool upside down with the donuts resting on wax paper until the candy coating hardens.
This step helps secure the sticks inside the donuts.
Step 3: Coat the Donut Pops
Dip each donut hole into the melted candy coating.
Turn the donut carefully until it is fully covered.
Allow excess coating to drip off before placing the pops upside down on parchment paper.
Let the coating harden completely.
Step 4: Decorate the Halloween Pops
Add candy eyes, sprinkles, drizzle, or black decorating gel to create Halloween designs.
Allow all decorations to set before serving.
Tips for the Best Halloween Cake Pops
Use candy melts that are in good condition. Avoid melting wafers with a white film inside the package because it can affect the finished appearance.
Dip the stick into melted candy before inserting it into the donut to help keep the pop secure.
If the coating feels too thick, mix in a small amount of oil to loosen the texture.
Allow each coating layer to cool before adding more decorations to prevent cracking or sliding.
Place decorated pops carefully while the coating sets to maintain a smooth finish.
Common Mistakes to Avoid
Using Thick Candy Coating
A coating that is too thick can make dipping difficult and create an uneven finish. Adjust the consistency if needed.
Decorating Before the Coating Sets
Adding decorations too soon can cause them to slide or disturb the candy coating.
Skipping the Stick Coating Step
Adding melted candy to the stick first helps create a stronger connection between the stick and donut.
Refrigerating the Cake Pops
Cold temperatures can cause candy coating to sweat and develop streaks or cracks.
Variations
Monster Cake Pops
Use candy eyes, sprinkles, and black decorating gel to create fun monster faces.
Candy Corn Cake Pops
Create a striped design using white, orange, and yellow candy coatings.
Drizzled Halloween Pops
Dip the pops in one color, allow them to set, then drizzle another color over the top.
Sprinkle-Dipped Pops
Allow the base coating to set for about 3 minutes, then dip into sprinkles for extra texture.
Ghost Cake Pops
Use white candy coating and simple decorations to create ghost-inspired treats.
Horned Monster Pops
Create small candy horns separately on wax paper, allow them to cool, then attach them with melted candy coating.
What to Serve With Halloween Cake Pops
These cake pops work well as part of a Halloween dessert spread.
Serve them with:
Halloween cupcakes
Mummy Halloween brownies
Cookies
Hot chocolate
Party snack trays
They also make fun individual treats for classroom celebrations or Halloween gatherings.
How to Store Halloween Cake Pops
Store Halloween cake pops at room temperature for the best results.
Refrigeration is not recommended because the candy coating can develop moisture, streaks, or cracks.
How to Freeze Halloween Cake Pops
Freezing is not recommended because the coating and texture may not hold up well after thawing.
Make Ahead
These Halloween cake pops can be prepared up to 24 hours in advance.
Store them at room temperature until ready to serve.
Frequently Asked Questions
Can I use regular cake instead of donut holes?
Yes, traditional cake pops can be made with cake and frosting, but this recipe uses donut holes as a shortcut for easier preparation.
Why do I need to dip the stick before inserting it?
The melted candy coating helps secure the stick inside the donut hole and keeps the pop more stable.
How do I make candy coating thinner?
If the coating is too thick, adding a small amount of oil can help create a smoother dipping consistency.
Can I refrigerate Halloween cake pops?
It is not recommended because moisture from refrigeration can affect the candy coating and create streaks or cracks.
How far ahead can I make these cake pops?
They can be prepared up to 24 hours before serving and stored at room temperature.