

Crispy Baked Hard Salami Cups with Creamy Spinach Artichoke Filling
Ingredients
Method
- Preheat the oven. Set your oven to 350°F (175°C) and allow it to preheat while you prepare the appetizer.
- Shape the salami cups. Press individual slices of hard salami into the cavities of a mini muffin tin, gently shaping them to line the bottom and sides of each cup.
- Prepare the creamy filling. In a mixing bowl, combine the softened cream cheese, spinach-artichoke dip, and garlic powder. Stir until the ingredients are evenly incorporated and the mixture is creamy.
- Fill the salami cups. Spoon the prepared cream cheese mixture into each salami-lined muffin cup, distributing the filling evenly.
- Bake the appetizers. Place the muffin tin in the preheated oven and bake for approximately 10 minutes, or until the filling looks warm and creamy.
- Serve. Remove the muffin tin from the oven. Allow the salami cups to cool slightly so they are easier to handle, then carefully lift them out and arrange them on a serving platter.
Notes
- The recipe makes 4 servings.
- Use softened cream cheese for easier mixing and a smoother filling.
- Press the salami slices into the mini muffin cups before adding the filling.
- Bake until the filling looks creamy, approximately 10 minutes.
- The exact number of individual salami cups depends on the size of the salami slices and mini muffin tin.
If you enjoy appetizers that combine savory flavors with creamy fillings, these little salami cups deserve a place on your party menu. Each bite brings together the salty, seasoned flavor of hard salami and the richness of spinach-artichoke cream cheese filling.
- Only four ingredients: Sliced salami, cream cheese, prepared spinach-artichoke dip, and garlic powder are all you need.
- A delicious contrast of textures: The salami holds its cup shape around a soft, warm filling, with edges that can become slightly crisp during baking.
- Perfect for entertaining: Their small size makes them easy to arrange on appetizer platters and serve at gatherings.
- Minimal preparation: There is no pastry dough to roll or complicated assembly required. A mini muffin tin does most of the shaping.
- Easy to customize: Different varieties of spinach-artichoke dip can subtly change the seasoning and flavor.
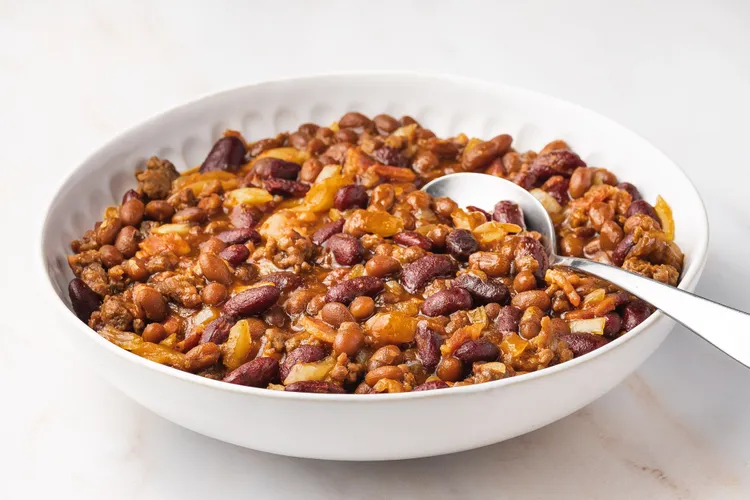
Slow Cooker Cowboy Beans with Ground Beef and Bacon
Ingredients
Method
- Gather the ingredients. Prepare all ingredients, chop the bacon and onions, and rinse and drain the kidney beans and lima beans.
- Cook the ground beef and bacon. Heat a large skillet over medium-high heat. Add the ground beef and chopped bacon. Cook for 7–10 minutes, stirring frequently and breaking the beef into small crumbles, until the ground beef is browned.
- Transfer to the slow cooker. Add the cooked ground beef and bacon to the slow cooker.
- Add the beans and onions. Stir in the chopped onions, baked beans with pork, rinsed kidney beans, and drained lima beans.
- Mix in the sauce ingredients. Add the ketchup, brown sugar, and prepared mustard. Stir thoroughly until the beans and meat are evenly coated with the sauce.
- Slow cook. Cover the slow cooker and cook on Low for at least 3 hours, until the mixture is hot, bubbling, and thickened.
- Stir and serve. Gently stir the cowboy beans before serving. Spoon into bowls and serve warm as a hearty main dish or alongside your favorite barbecue foods.
Notes
- Cowboy beans are also known as chuckwagon beans and are associated with Southwestern American cooking.
- This recipe combines ground beef, bacon, baked beans, kidney beans, and lima beans in a sweet and tangy sauce.
- Serve as a hearty barbecue side dish or as a main course with cornbread.
- Store leftovers in an airtight container in the refrigerator for up to 4 days.
- Reheat leftovers in the microwave or on the stovetop until thoroughly heated.
- Cowboy beans can be frozen for up to 4 months.
Cowboy beans are the kind of comfort food that works just as well for a backyard barbecue as it does for a casual family dinner. With tender beans, savory beef, smoky bacon, and a thick, sweet barbecue-style sauce, every spoonful is filling and flavorful.
Here is what makes this recipe worth adding to your meal rotation:
- Hearty enough for dinner: Ground beef, bacon, and three kinds of beans make this more substantial than ordinary baked beans.
- Rich, balanced flavor: The sweetness of brown sugar and ketchup pairs with savory meat and the tanginess of prepared mustard.
- Simple slow cooker preparation: After browning the meat, the slow cooker handles the remaining cooking.
- Great for feeding a group: This generous recipe works well for potlucks, cookouts, and family gatherings.
- Leftovers reheat easily: The saucy beans can be refrigerated or frozen, making them practical for meal planning.
Whether you serve them beside grilled meats or enjoy a bowl with warm cornbread, cowboy beans are a satisfying choice when you want something comforting without spending hours actively cooking.
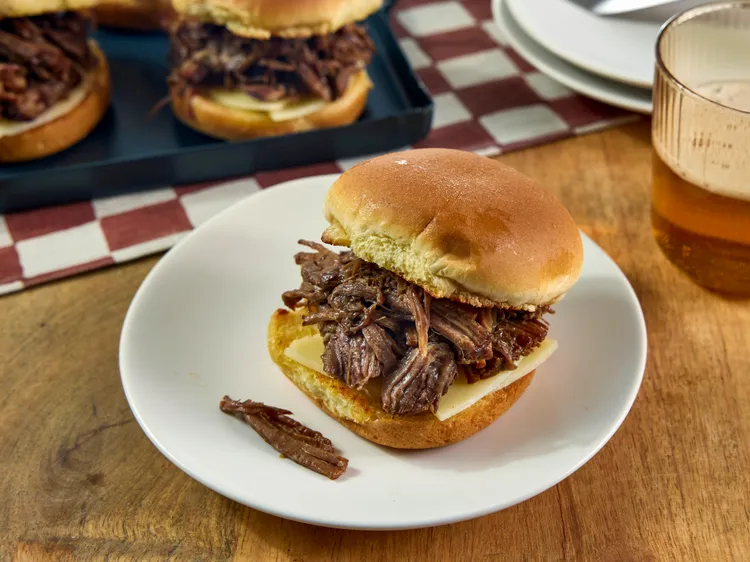
Slow Cooker Philly-Style Shredded Beef Sliders with Melted Provolone
Ingredients
Method
- Season the beef. Sprinkle 1 teaspoon of seasoned salt over each side of the chuck roast, making sure both sides are evenly seasoned.
- Prepare the slow cooker. Set the slow cooker to Low. Arrange most of the sliced onion in an even layer across the bottom, reserving a few slices for the top of the roast.
- Brown the chuck roast. Heat the cooking oil in a nonstick skillet over medium-high heat until shimmering. Add the seasoned roast and sear for 3–4 minutes per side, until browned.
- Add the beef and cooking liquid. Transfer the browned roast to the slow cooker, placing it over the onions. Pour in the undiluted beef consommé and Worcestershire sauce. Arrange the reserved onion slices over the beef.
- Slow cook until tender. Cover and cook on Low for 8–10 hours, or until the roast is very tender and easily pulls apart with a fork.
- Shred the beef. Carefully transfer the cooked roast to a cutting board. Use two forks to shred the meat, removing and discarding any excess fat and tough membranes.
- Keep the beef warm. Return the shredded beef to the slow cooker and gently mix it with the cooking juices. Keep warm while preparing the buns.
- Toast the slider buns. Melt the butter in a nonstick skillet over medium heat. Open the slider buns and place them cut-side down in the skillet. Toast for 2–3 minutes, until lightly golden. Repeat with the remaining buns, adding more butter if needed.
- Assemble the sliders. Place a half-slice of provolone cheese on each bun half. Add approximately ⅓ cup shredded beef to each bottom bun, squeezing out most of the cooking liquid first. Top with cooked onions, as desired.
- Serve warm. Place the top buns over the filling and serve while the beef is warm and the cheese is softened.
Notes
- For a different cheese option, replace the provolone with Cheez Whiz. Spread it onto each bun half before assembling the sliders.
- Use a boneless beef chuck roast for tender, easily shredded beef.
- The roast should cook on Low for 8–10 hours, depending on how quickly it becomes fork-tender.
- Remove excess cooking liquid from the shredded beef before assembling to help prevent soggy buns.
- The recipe makes 8 sliders, with one slider per serving.
A good beef slider should have tender meat, plenty of savory flavor, and just enough melted cheese to bring everything together. These slow cooker sliders deliver that combination without requiring traditional cheesesteak cuts.
Instead of thinly sliced steak, this recipe uses chuck roast, which becomes wonderfully tender after several hours of slow cooking. The beef absorbs the flavor of onions, beef consommé, and Worcestershire sauce, creating a juicy, rich filling for toasted slider buns.
Here’s why this recipe works so well:
- Tender, flavorful beef: Slow cooking transforms chuck roast into soft, easily shredded meat with a rich, beefy flavor.
- A budget-conscious alternative: Chuck roast offers a practical way to make Philly-inspired sandwiches without purchasing traditional cheesesteak cuts.
- Minimal hands-on cooking: Once the roast is browned and placed in the slow cooker, most of the preparation is finished.
- Buttery, toasted buns: Toasting adds flavor and creates a sturdier base for the juicy shredded beef.
- Great for casual entertaining: Individual sliders are easy to serve at game-day gatherings, family dinners, and parties.
These sandwiches aren’t traditional Philadelphia cheesesteaks, but they capture the appealing combination of savory beef, onions, and cheese in a convenient, slow-cooked version.
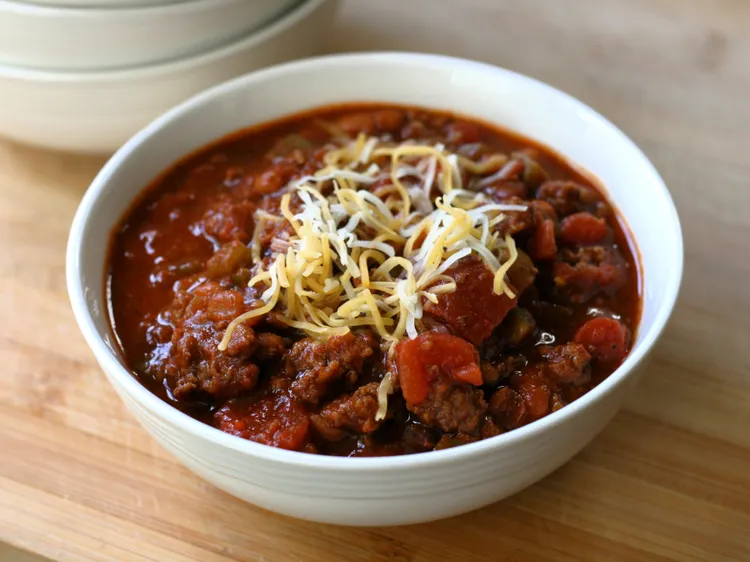
Easy Texas Chili Recipe with Ground Beef and Pinto Beans
Ingredients
Method
- Brown the ground beef. Place a large pot over medium heat. Add the ground beef, diced onion, and minced bell pepper. Cook for approximately 10 minutes, stirring frequently and breaking the beef into small crumbles, until the meat is browned and the vegetables are tender.
- Drain excess grease. Carefully drain and discard the grease from the cooked beef mixture to prevent the chili from becoming overly oily.
- Add the beans and tomatoes. Stir in the pinto beans with their liquid, diced tomatoes with their juices, and tomato sauce. Mix until everything is evenly combined.
- Season the chili. Add the chili powder, optional minced jalapeños, crushed red pepper flakes, ground black pepper, salt, and garlic powder. Stir thoroughly to distribute the seasonings.
- Bring to a gentle boil. Increase the heat as needed and bring the mixture to a slow boil, stirring occasionally.
- Simmer the chili. Cover the pot, reduce the heat to low, and let the chili simmer for at least 30 minutes. Stir occasionally to prevent the beans and tomato sauce from sticking to the bottom.
- Develop the flavor. For a deeper, richer flavor, continue simmering for up to several hours, checking and stirring periodically. Add a little water if the chili becomes too thick during extended cooking.
- Serve warm. Stir the chili before serving. Ladle into bowls and enjoy as a filling main dish with your favorite toppings or side dishes.
Notes
- You can substitute 6 cups of homemade cooked pinto beans with their cooking liquid for the 3 cans of pinto beans.
- The spice level can be adjusted to suit your preferences. Omit the optional jalapeños for a milder version, or adjust the amount of spicy seasonings as desired.
- This chili develops more flavor as it rests and may taste even better the following day.
- Simmer for at least 30 minutes, or continue cooking for several hours for a deeper, more developed flavor.
- Stir occasionally during simmering to prevent the chili from sticking to the bottom of the pot.
- The classic bean-free version of Texas chili differs from this home-style recipe, which includes pinto beans.
A big pot of homemade chili is one of the easiest ways to turn everyday ingredients into a satisfying dinner. This Texas-style version combines browned ground beef, tender pinto beans, tomatoes, and plenty of chili seasoning for a rich, hearty meal.
Unlike traditional Texas chili, which is often made without beans, this home-style recipe includes pinto beans for extra texture and a more substantial bowl.
Here are a few reasons to make it:
- Bold, savory flavor: Ground beef, tomatoes, chili powder, and peppers create a deeply seasoned chili with a satisfying balance of richness and heat.
- Simple one-pot preparation: Everything cooks in one large pot, making preparation and cleanup easier.
- Adjustable spice level: Optional jalapeños let you control the heat, while the other seasonings provide plenty of flavor.
- Great for leftovers: The flavors continue to blend as the chili rests, making it an excellent make-ahead dinner.
- Perfect for feeding a crowd: The generous batch works well for family meals, potlucks, game-day parties, and casual gatherings.
The chili is delicious after its initial simmer, but allowing it to cook longer gives the seasonings more time to blend into the tomato-based sauce.
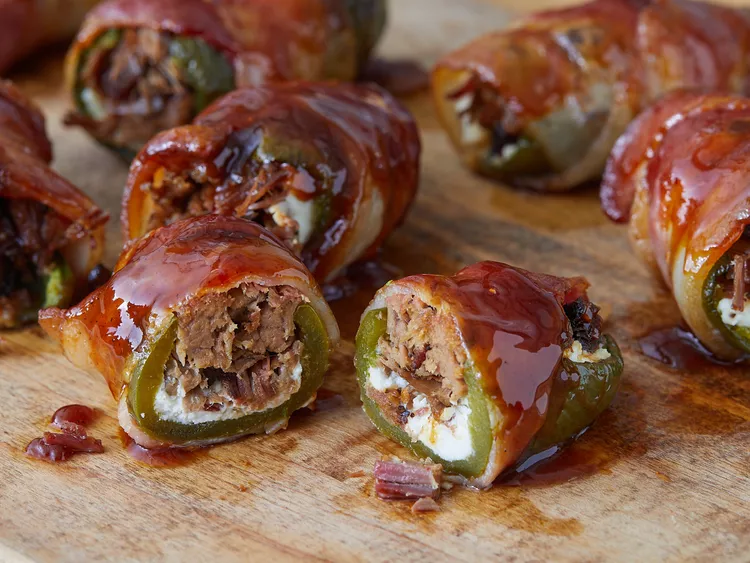
Texas Twinkies Recipe – Bacon-Wrapped Jalapeños Stuffed with Brisket
Ingredients
Method
- Preheat the oven. Set your oven to 300°F (150°C). Prepare a baking sheet for the jalapeños.
- Cut the jalapeños. Make a T-shaped opening in each pepper by cutting a vertical slit from top to bottom and a horizontal slit directly beneath the stem. Cut only halfway through each pepper, keeping it intact so it can hold the filling.
- Remove the seeds. Gently open each jalapeño and use a small spoon to scrape out the seeds and inner membranes. Discard them.
- Bake the peppers. Arrange the hollowed jalapeños on the baking sheet and bake for 10 minutes at 300°F (150°C).
- Cool in ice water. Transfer the peppers to a bowl of ice water for a few minutes. This step is intended to help remove some remaining pepper oils. Drain and thoroughly blot dry with paper towels.
- Increase the oven temperature. Set the oven to 350°F (175°C).
- Add the cream cheese. Spread 1 tablespoon of softened cream cheese inside each prepared jalapeño, distributing it along the inner surface.
- Stuff with brisket. Fill each pepper with approximately 2 ounces of cooked chopped brisket, gently pressing it into the opening without tearing the pepper.
- Wrap with bacon. Wrap one slice of thick-cut bacon around each stuffed jalapeño, covering the opening as much as possible to help secure the filling.
- Season the poppers. Arrange the bacon-wrapped jalapeños on a baking sheet and sprinkle with kosher salt and ground black pepper to taste.
- Bake until cooked. Place the baking sheet in the 350°F (175°C) oven and bake for 30 minutes. The bacon should be cooked, and the filling should be heated through.
- Brush with BBQ sauce. Remove the poppers from the oven and generously brush the tops with BBQ sauce.
- Finish baking. Return the poppers to the oven and bake for another 5 minutes, allowing the BBQ sauce to warm and form a glossy glaze.
- Serve warm. Remove from the oven and let the Texas Twinkies cool slightly before serving.
Notes
- This recipe requires pre-cooked brisket and is an excellent way to use leftover smoked brisket.
- Each jalapeño is filled with softened cream cheese and chopped brisket, wrapped with thick-cut bacon, and finished with BBQ sauce.
- The recipe uses two oven temperatures: 300°F (150°C) for the initial pepper preparation and 350°F (175°C) for baking the stuffed poppers.
- The jalapeños are cut with a T-shaped opening to keep them intact while allowing enough space for the filling.
- Remove the seeds and membranes before stuffing. The ice-water step may help rinse away some residual pepper compounds, although it does not guarantee that the peppers will become mild.
- Bacon cooking time may vary depending on its thickness. Make sure the bacon is fully cooked before serving.
Texas Twinkies take everything people enjoy about jalapeño poppers and give it a hearty barbecue twist. Instead of filling peppers with cream cheese alone, this version adds tender chopped brisket, wraps everything in smoky bacon, and finishes with a sticky BBQ glaze.
The combination is rich and satisfying, with a little heat from the jalapeños to balance the creamy, savory filling.
- Perfect for leftover brisket: Cooked brisket gets a second life as a flavorful appetizer instead of simply being reheated.
- A delicious mix of textures: Tender peppers, creamy cheese, chopped beef, and bacon create a satisfying bite.
- Sweet, smoky, and spicy: BBQ sauce balances the salty bacon and mild tang of cream cheese, while jalapeños bring a little heat.
- Great for entertaining: These individually portioned appetizers are easy to arrange on a serving platter for parties and cookouts.
- Easy oven preparation: You don’t need a smoker to make this version. The oven cooks the peppers, filling, and bacon before the final glaze is added.
They are especially useful when you have leftover barbecue meat and want something different from another brisket sandwich.

Easy Buffalo Chicken Dip with Cream Cheese, Ranch and Cheddar
Ingredients
Method
- Prepare the ingredients. Gather everything you need. Drain the canned chicken, soften the cream cheese, and shred the Cheddar cheese if necessary.
- Heat the chicken and hot sauce. Place a large skillet over medium heat. Add the drained chicken and hot pepper sauce. Cook for 3–5 minutes, stirring occasionally, until the chicken is heated through and coated in the sauce.
- Add the cream cheese and ranch. Stir the softened cream cheese and ranch dressing into the chicken mixture. Continue cooking for 3–5 minutes, stirring frequently, until the cream cheese melts and the mixture becomes smooth, creamy, and warm.
- Mix in half the cheddar. Add half of the shredded Cheddar cheese (¾ cup) to the skillet. Stir until evenly combined with the creamy chicken mixture.
- Transfer to the slow cooker. Spoon the prepared mixture into a slow cooker, spreading it into an even layer.
- Add the remaining cheese. Sprinkle the remaining ¾ cup shredded Cheddar cheese evenly over the top.
- Cook until hot and bubbly. Cover the slow cooker and cook on Low for approximately 35 minutes, or until the dip is thoroughly heated, bubbling, and the cheese on top has melted.
- Serve warm. Serve the Buffalo chicken dip directly from the slow cooker with celery sticks and chicken-flavored crackers, if desired.
Notes
- Chicken substitution: Replace the canned chicken with approximately 3 cups of cooked chicken breast, finely chopped or shredded.
- Cream cheese: Use softened cream cheese to help it blend smoothly with the ranch dressing and hot sauce.
- Adjustable heat: Increase or decrease the hot pepper sauce to suit your preferred spice level.
- Serving suggestions: Serve with celery sticks, carrot sticks, flavored crackers, toasted baguette slices, or pita chips.
- Other uses: The dip can also be used as a filling for quesadillas or slider sandwiches.
- Keep warm: The dip can be held warm in the slow cooker using a food-safe warm setting.
- Refrigeration: Cool promptly, transfer to a shallow airtight container, and refrigerate for up to 4 days.
- Reheating: Reheat gently on the stovetop, in the microwave, or in a slow cooker until thoroughly hot.
- Freezing: Freeze cooled dip in a zip-top freezer bag for up to 2 months. Remove excess air before sealing.
- Thawing: Thaw frozen dip overnight in the refrigerator before reheating.
- Texture after freezing: The cream cheese and ranch dressing may separate slightly or become grainy after freezing and thawing.
Buffalo chicken dip brings together the tangy heat of Buffalo wings and the rich, cheesy texture of a warm party dip. It’s an easy way to serve those familiar flavors without preparing individual chicken wings.
This version starts on the stovetop, where the chicken, hot sauce, cream cheese, and ranch dressing are combined, then finishes in the slow cooker beneath a layer of melted cheddar.
Here’s what makes it especially convenient:
- Classic Buffalo wing flavor: Hot pepper sauce, chicken, ranch dressing, and cheese create the spicy, tangy combination that makes Buffalo-style appetizers so popular.
- Rich and creamy texture: Softened cream cheese melts into the ranch dressing, creating a thick dip that clings nicely to crackers and vegetables.
- Easy pantry-friendly preparation: Canned chicken makes the recipe convenient when you don’t have time to cook chicken from scratch.
- Perfect for gatherings: The slow cooker keeps the dip warm and makes it easy for guests to serve themselves.
- Flexible serving options: Enjoy it with celery, crackers, pita chips, toasted bread, or use leftovers in sandwiches and quesadillas.
The dip is especially satisfying when served hot, with the cheddar melted and the creamy filling easy to scoop.

Easy Cocktail Meatballs with Sweet and Tangy Cranberry Chili Sauce
Ingredients
Method
- Preheat the oven. Set your oven to 350°F (175°C). Prepare a nonstick baking sheet for the meatballs.
- Prepare the meatball mixture. In a large mixing bowl, combine the ground beef, bread crumbs, minced onion, water, and egg. Mix gently until all ingredients are evenly incorporated.
- Shape the meatballs. Roll the mixture into small, evenly sized meatballs and arrange them in a single layer on the prepared baking sheet, leaving a little space between each one.
- Bake the meatballs. Place the baking sheet in the preheated oven and bake for 20–25 minutes, turning the meatballs once halfway through cooking. Bake until browned and cooked through, reaching an internal temperature of 160°F (71°C).
- Prepare the cranberry chili sauce. While the meatballs bake, combine the jellied cranberry sauce, chili sauce, brown sugar, and lemon juice in a large saucepan over low heat.
- Stir until smooth. Heat the sauce gently, stirring occasionally, until the cranberry sauce melts and the ingredients form a smooth, evenly blended mixture.
- Add the cooked meatballs. Transfer the baked meatballs into the saucepan, stirring gently to coat them evenly with the sweet and tangy sauce.
- Simmer the meatballs. Keep the saucepan over low heat and allow the meatballs to simmer in the sauce for 1 hour. Stir occasionally to prevent sticking and maintain an even coating.
- Serve warm. Transfer the meatballs to a serving dish or keep them warm in a slow cooker. Serve with toothpicks for an easy party appetizer.
Notes
- The sauce is made with jellied cranberry sauce, chili sauce, brown sugar, and lemon juice.
- Bake the homemade meatballs before adding them to the sauce.
- Simmer the cooked meatballs in the sauce for 1 hour before serving.
- A slow cooker can be used to simmer the cooked meatballs and keep them warm for parties.
- Frozen or store-bought fully cooked meatballs can be used as a quicker alternative, although the original recipe uses homemade ground beef meatballs.
- For safe serving, keep the meatballs at 140°F (60°C) or above when holding them warm for guests.
Cocktail meatballs are a classic party appetizer for a reason. They’re easy to serve, satisfying to eat, and versatile enough to fit almost any gathering.
This version combines homemade beef meatballs with a cranberry chili sauce that strikes a delicious balance between sweet, tangy, and savory.
The meatballs are baked first, then simmered gently in the sauce so every bite gets coated in flavor.
- Perfect balance of flavors: Cranberry sauce adds fruity sweetness, chili sauce brings tangy tomato flavor, and lemon juice gives the glaze a bright finish.
- Tender homemade meatballs: Ground beef, bread crumbs, onion, and egg create meatballs that hold together while remaining pleasantly tender.
- Great for entertaining: Their small size makes them easy to serve with toothpicks at parties and holiday gatherings.
- Convenient slow cooker option: Once cooked, the meatballs can be kept warm in a slow cooker for serving.
- Make-ahead friendly: Both the meatballs and sauce can be prepared in advance, making party planning easier.
They’re particularly well suited to holiday celebrations, when a warm appetizer that guests can serve themselves is especially useful.
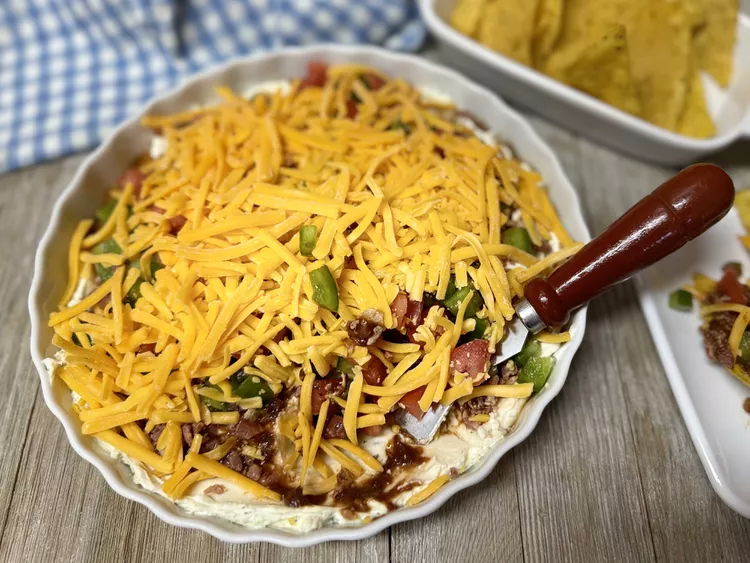
Easy BBQ Bacon Ranch Dip – Creamy Six-Layer Party Dip
Ingredients
Method
- Place bacon in a large, deep skillet and cook over medium-high heat, turning occasionally, until evenly browned, about 10 minutes. Drain bacon slices on a paper towel-lined plate. Crumble cooled bacon into a bowl and set aside.
- Stir together cream cheese and ranch dressing mix in a bowl until smooth. Spread mixture on the bottom of a pie dish. Evenly spread barbecue sauce on top of cream cheese mixture. Layer bacon, bell pepper, and tomato on top of barbecue sauce and top with Cheddar cheese. Cover and chill for 1 hour before serving.
Notes
The cream cheese should be softened before mixing with the ranch dressing mix.
Allow the cooked bacon to cool before crumbling it.
Cover and chill the assembled dip for 1 hour before serving.
The recipe is intended for parties, movie nights, and barbecues.
Some party dips are all about melted cheese, while others rely on fresh ingredients and creamy layers. This BBQ Bacon Ranch Dip brings both ideas together in a chilled appetizer that combines smoky bacon, ranch seasoning, barbecue sauce, crunchy vegetables, and sharp cheddar.
The cream cheese forms a thick, flavorful base, while the barbecue sauce adds sweetness and tang. Crispy bacon brings a savory crunch, and the fresh bell pepper and tomato keep the dip from feeling too heavy.
Here’s why it’s a great addition to your appetizer menu:
- Six delicious layers: Every scoop combines creamy, smoky, tangy, cheesy, and fresh flavors.
- Perfect for making ahead: The assembled dip needs time in the refrigerator, making it convenient for party preparation.
- Simple, familiar ingredients: Everything is made with easy-to-find grocery store staples.
- No baking required: Once the bacon is cooked, the remaining preparation involves mixing and layering.
- Great for sharing: The generous dish is ideal for barbecues, potlucks, movie nights, and game-day gatherings.
Because it’s served cold, you don’t need to keep it bubbling in the oven or warm in a slow cooker. Just bring it out when guests are ready to eat.
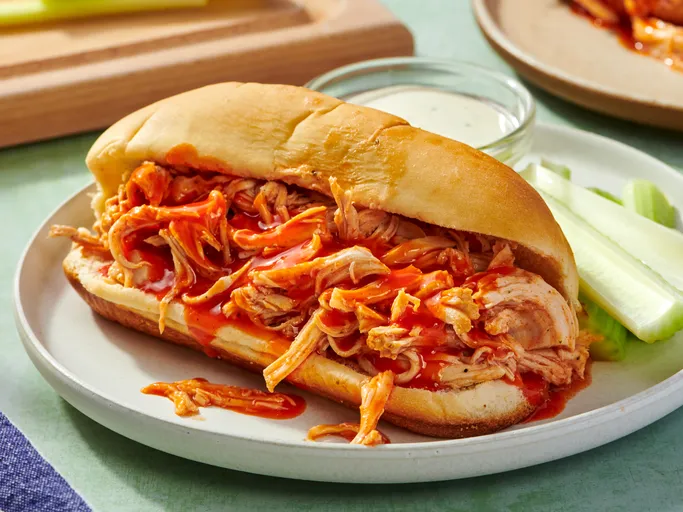
Easy Slow Cooker Buffalo Chicken Sandwiches with Ranch
Ingredients
Method
- Prepare the ingredients. Gather the chicken breasts, Buffalo wing sauce, dry ranch dressing mix, butter, and hoagie rolls.
- Add the chicken to the slow cooker. Arrange the boneless, skinless chicken breasts in the bottom of the slow cooker, spreading them out as evenly as possible.
- Add the Buffalo sauce and ranch seasoning. Pour ¾ of the Buffalo wing sauce over the chicken, reserving the remaining ¼ for serving. Sprinkle the dry ranch dressing mix evenly over the chicken.
- Slow cook the chicken. Cover the slow cooker and cook on Low for 6–7 hours, until the chicken is fully cooked and tender enough to shred easily. The chicken should reach an internal temperature of 165°F (74°C).
- Shred the chicken. Use two forks to pull the chicken apart directly inside the slow cooker, allowing the shredded meat to mix with the Buffalo sauce and cooking juices.
- Stir in the butter. Add the butter to the shredded chicken and stir gently until melted and incorporated into the warm sauce.
- Prepare the hoagie rolls. Split the hoagie rolls lengthwise, keeping them connected on one side if preferred. Arrange them on a serving platter or individual plates.
- Assemble the sandwiches. Spoon generous portions of shredded Buffalo chicken into each hoagie roll, dividing the mixture evenly among the six sandwiches.
- Add the remaining Buffalo sauce. Drizzle the reserved Buffalo wing sauce over the sandwiches or serve it on the side so everyone can adjust the heat.
- Serve warm. Enjoy immediately while the chicken is warm and juicy. Add blue cheese or ranch dressing as an optional topping.
Notes
- Use ¾ of the Buffalo wing sauce during slow cooking and reserve the remaining ¼ for serving.
- Shred the chicken directly in the slow cooker using two forks.
- Blue cheese dressing or ranch dressing can be added as optional sandwich toppings.
- The recipe makes 6 sandwiches using hoagie rolls split lengthwise.
- The recipe card lists 6 hours of cooking, while the detailed method allows 6–7 hours on Low. Cook until the chicken is fully cooked and shreds easily.
- For safe cooking, check that the chicken reaches an internal temperature of 165°F (74°C).
Buffalo chicken sandwiches are a satisfying way to enjoy the bold, tangy flavor of Buffalo wings without frying chicken or preparing individual wings.
This slow cooker version keeps preparation simple. The chicken cooks gently in Buffalo wing sauce and ranch seasoning until tender, then gets shredded and mixed with butter for a rich, flavorful filling.
Pile the chicken into hoagie rolls, add your favorite dressing, and dinner is ready.
- Only five main ingredients: Chicken, Buffalo sauce, ranch seasoning, butter, and hoagie rolls create a flavorful meal without a complicated shopping list.
- Easy slow cooker preparation: Once the ingredients are added, the slow cooker handles nearly all the cooking.
- Tender, juicy chicken: The chicken cooks in a flavorful sauce before being shredded and mixed with the cooking juices.
- Perfect for game days: These sandwiches are convenient for football gatherings and casual parties.
- Customizable heat and toppings: Add more Buffalo sauce for extra spice or finish with ranch or blue cheese dressing for a cooling contrast.
The result is a hearty sandwich with juicy shredded chicken, plenty of Buffalo flavor, and a soft roll that holds everything together.