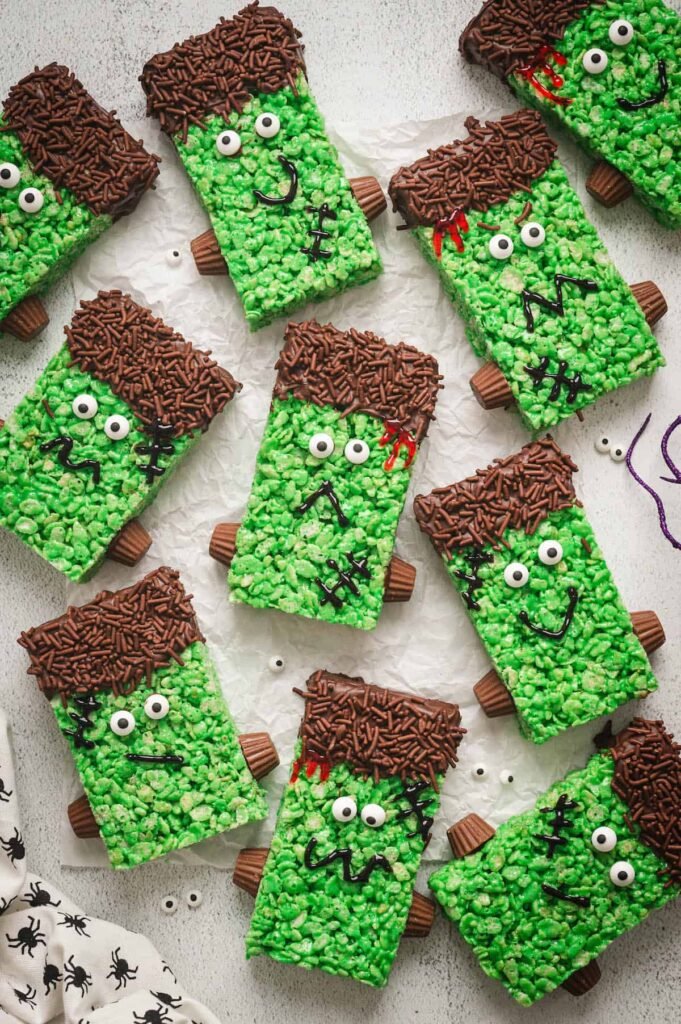
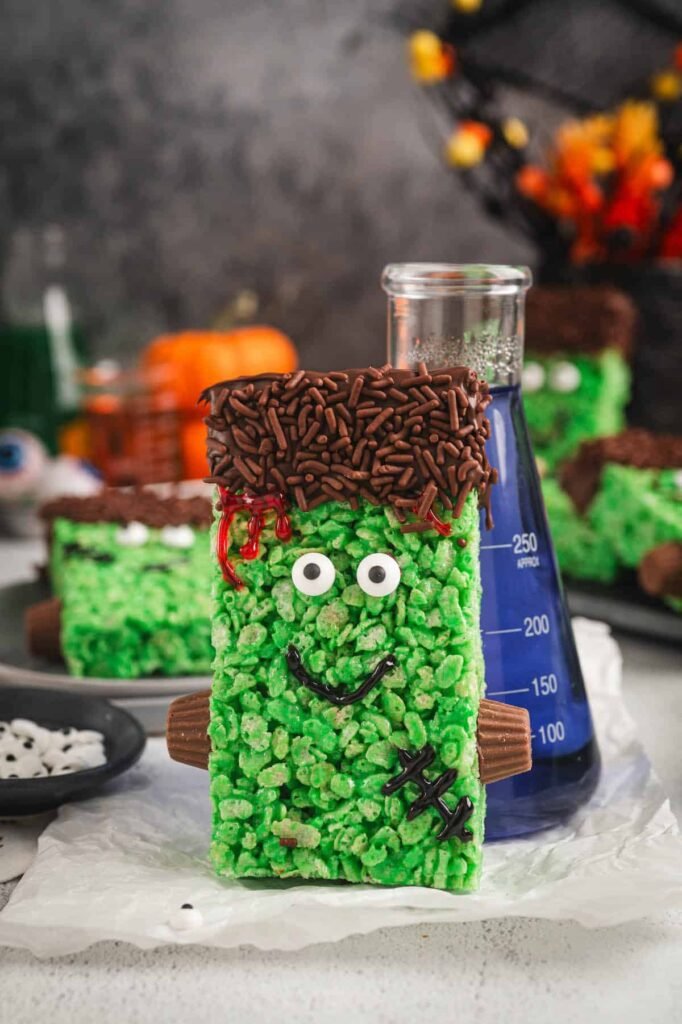
These Frankenstein Halloween Rice Krispies Treats turn a familiar marshmallow cereal bar into a playful party dessert. Each bright green rectangle gets chocolate sprinkle “hair,” candy eyes, peanut butter cup neck bolts, and gel-drawn facial details—all without complicated decorating equipment.
Recipe Snapshot
- Prep Time: 30 minutes
- Cook Time: 5 minutes
- Cooling Time: 15 minutes
- Total Time: 50 minutes
- Yield: 10 treats
- Calories: 376 kcal per serving
- Course: Dessert
- Cuisine: American
- Method: Stovetop, no-bake
- Theme: Halloween
The Frankenstein Decorating Plan
Each cereal bar is decorated with four recognizable features:
- Green face: Food coloring is stirred into the melted marshmallow mixture.
- Chocolate hair: One end is dipped in semisweet chocolate and covered with chocolate sprinkles.
- Eyes and neck bolts: Candy eyeballs and miniature peanut butter cups are attached with melted chocolate.
- Face and stitches: Black writing gel creates the mouth and scars, while optional red gel adds extra Halloween detail.
Preparing all decorations before cutting the treats makes assembly smoother because the melted chocolate begins firming once applied.
Why These Treats Work for a Halloween Party
- The base is made in one pot. Butter, marshmallows, coloring, and cereal form the entire green cereal layer.
- No oven is needed. Only the stovetop and microwave are used.
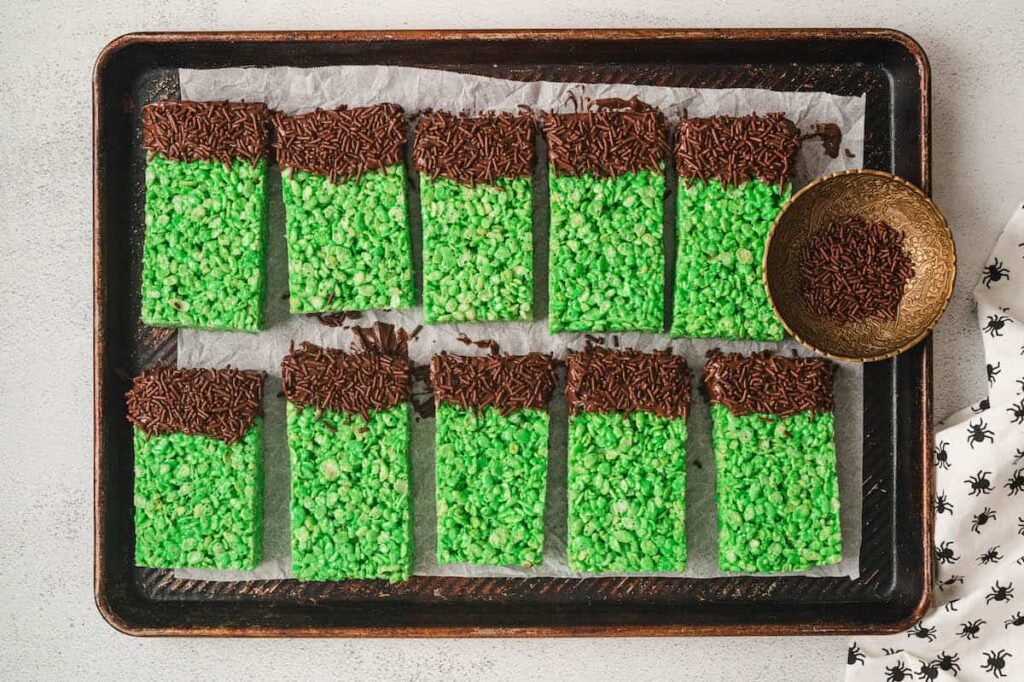
- The cutting pattern creates ten equal monsters. The slab is divided lengthwise, then each half is cut into five rectangles.
- Every face can look different. The writing gel makes it easy to vary mouths, stitches, and expressions.
- They can be prepared the night before. An airtight room-temperature container keeps them ready for the next day.
- The decoration is part of the portioning. Each rectangle receives two eyes and two peanut butter cup bolts.
Ingredients and Their Jobs
For the Green Cereal Base
- Nonstick baking spray
- 4 tablespoons unsalted butter
- 10 ounces mini marshmallows, about 5½ cups
- Pinch of kosher salt
- Green food coloring
- 5 cups Rice Krispies cereal
Butter helps the marshmallows melt smoothly and gives the bars richness. Fresh mini marshmallows are especially useful because they melt more evenly than marshmallows that have begun drying out.
The salt balances the sweetness without making the treats taste salty. Food coloring creates the monster-green base, but the exact quantity depends on whether you use liquid, gel, or another concentrated formula.
For the Chocolate Hair
- 8 ounces semisweet chocolate chips
- ¼ cup chocolate sprinkles
Semisweet chocolate adds a darker, less sugary contrast to the marshmallow base. The sprinkles should be applied immediately after dipping while the chocolate is still wet enough to hold them.
For the Frankenstein Faces
- 20 candy eyeballs
- 20 unwrapped Reese’s Minis
- Black writing gel
- Red writing gel, optional
Each of the ten treats receives two eyes and two peanut butter cups. The peanut butter cups form the monster’s neck bolts.
This recipe contains peanut candy. If serving guests with allergies, check every product label and replace the peanut butter cups only with an appropriately labeled alternative that meets their dietary needs.
Equipment
- 13×9-inch baking pan
- Large pot
- Wooden spoon or heat-resistant spatula
- Parchment or wax paper
- Cutting board
- Sharp knife
- Microwave-safe glass or bowl deep enough for dipping
- Microwave
- Flat parchment-lined tray for decorated treats
A narrower, deeper container makes dipping easier because the chocolate forms a deeper pool around one end of each rectangle.
Set Up Before Melting the Marshmallows
The cereal mixture begins setting as it cools, so prepare the workspace first:
- Coat the bottom and sides of the pan with baking spray.
- Measure the cereal into a bowl or keep it ready beside the stove.
- Open the marshmallow bag.
- Place parchment paper near the pan.
- Unwrap all 20 peanut butter cups.
- Count out 20 candy eyeballs.
- Prepare a parchment-lined surface for the decorated treats.
Having these components ready prevents delays once the marshmallow mixture is smooth.
How to Make Frankenstein Rice Krispies Treats
Melt the butter gently
Place the butter in a large pot over medium-low heat. Allow it to melt without browning.
Lower heat is important because marshmallows can become overly hot and sticky if cooked aggressively.
Create the green marshmallow mixture
Add the mini marshmallows and a pinch of kosher salt. Stir continuously as they soften.
Once the marshmallows begin melting, add enough green food coloring to create a bright green shade. Start conservatively, mix thoroughly, and evaluate the color before adding more.
Continue stirring until the mixture is completely smooth. Remove the pot from the heat as soon as the marshmallows have melted.
Coat the cereal
Immediately add the Rice Krispies cereal. Fold and stir until every piece is coated with the green marshmallow mixture and no dry cereal remains at the bottom of the pot.
Work steadily but avoid crushing the cereal with forceful stirring.
Shape the slab without compacting it
Transfer the mixture to the prepared 13×9-inch pan.
Cover it with a piece of parchment or wax paper and press it into an even layer. Greased hands or a lightly sprayed spatula can also be used.
Apply enough pressure to fill the corners and create an even thickness, but do not pack the cereal down as firmly as possible. Excessive pressure removes air pockets and can make the finished bars dense and hard.
Cool for 15 minutes
Leave the pan at room temperature for 15 minutes.
The slab should become stable enough to remove and cut while remaining soft. Cutting it too early can distort the rectangles, while letting it stand much longer may make the surface firmer.
Cut ten monster shapes
Turn the cooled slab onto a cutting board.
Cut the large rectangle in half lengthwise to create two long sections. Cut each section crosswise into five pieces. You should now have ten rectangular treats.
A gentle sawing motion helps the knife pass through without compressing the cereal bars.
Decorate the Frankenstein Faces
Melt the chocolate carefully
Place the semisweet chocolate chips in a microwave-safe glass or bowl deep enough to accommodate one end of a treat.
Microwave in 30-second intervals, stirring thoroughly after each interval. Stop heating once the remaining small pieces melt through stirring.
Overheated chocolate can become thick or scorched, making clean dipping more difficult.
Make the chocolate hair
Dip one short end of each rectangle into the melted chocolate. Lift it out and allow excess chocolate to drip back into the bowl.
Place the treat on parchment paper and immediately cover the wet chocolate with sprinkles. Repeat with the remaining rectangles.
Attach the eyes
Use small dots of melted chocolate as edible glue. Press two candy eyeballs onto the front of each green cereal bar.
Hold each eye briefly if needed so it does not slide before the chocolate begins setting.
Add the neck bolts
Attach one unwrapped Reese’s Mini to each side of the lower portion of every treat. Use melted chocolate to secure the candy.
Position the cups at a similar height on both sides so they read clearly as Frankenstein-style bolts.
Draw the faces
Use black writing gel to create a mouth, forehead stitches, cheek scars, or other monster details.
Add small amounts of red writing gel if desired. Keep the lines simple so the features remain easy to recognize against the green background.
Allow the chocolate attachments to set before transferring or stacking the treats.
Tips for Soft, Easy-to-Decorate Treats
- Open a fresh bag of marshmallows. Soft marshmallows melt more smoothly and support a better final texture.
- Use medium-low heat. High heat can make the marshmallow mixture overly sticky and may contribute to firmer bars.
- Remove the pot once the marshmallows are smooth. Continued cooking is unnecessary.
- Add coloring gradually. Different formulas have different strengths, especially liquid versus gel coloring.
- Coat the cereal thoroughly. Dry patches can cause weak or crumbly sections.
- Press evenly, not aggressively. Compacting the mixture too tightly produces harder treats.
- Grease pressing tools lightly. Nonstick spray keeps the marshmallow mixture from pulling away from the pan.
- Use a deep container for dipping. It creates a more defined chocolate hairline with less tilting.
- Apply sprinkles immediately. They will not adhere once the chocolate begins setting.
- Let attachments firm before moving the treats. Soft chocolate can allow eyes and bolts to slide.
Troubleshooting
Problem: The cereal bars are hard
Likely cause: The marshmallows were cooked too long, or the mixture was packed too firmly into the pan.
Solution: Melt the marshmallows over medium-low heat and remove the pot as soon as they become smooth. Press the mixture only enough to form an even slab.
Problem: The mixture sticks to everything
Likely cause: Marshmallow mixture is naturally sticky, and the pressing surface was not greased.
Solution: Lightly coat your hands, spoon, spatula, parchment, or wax paper with nonstick spray before pressing.
Problem: The green color looks uneven
Likely cause: The food coloring was added after the cereal or was not fully incorporated into the melted marshmallows.
Solution: Mix the coloring into the smooth marshmallow base before adding the cereal.
Problem: The chocolate is too thick for dipping
Likely cause: The chocolate may have been overheated or allowed to cool too much.
Solution: Melt it in short intervals and stir thoroughly. Use a container that creates enough depth to coat the end without excessive movement.
Problem: The sprinkles keep falling off
Likely cause: They were added after the chocolate had started setting.
Solution: Sprinkle each treat immediately after dipping instead of dipping all ten before adding decorations.
Problem: The candy eyes slide downward
Likely cause: Too much melted chocolate was used as adhesive, or the chocolate was still very warm.
Solution: Apply a small dot, press the eye into place, and hold it briefly while the chocolate begins to set.
Problem: The rectangles are uneven
Likely cause: The cereal mixture was not spread to a consistent thickness or the cutting pattern was estimated.
Solution: Level the mixture from corner to corner. After cooling, divide the slab lengthwise first, then cut each half into five pieces.
Decoration Ideas Without Changing the Base Recipe
Different expressions
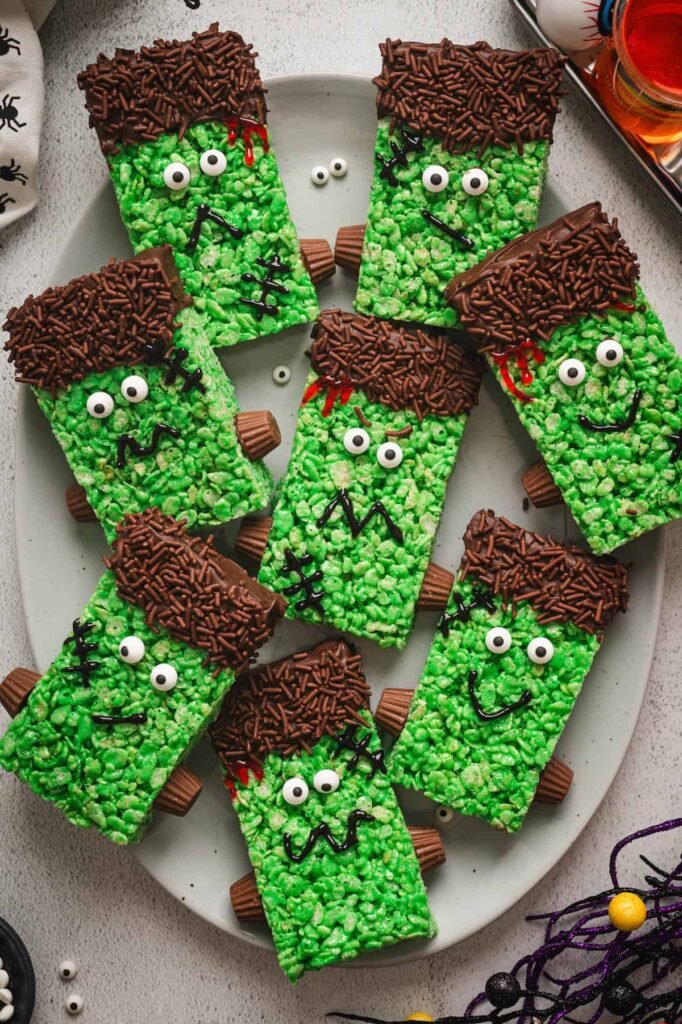
Use the black gel to create zigzag mouths, straight mouths, smiles, frowns, and scars. Varying the expressions makes the tray look more playful without requiring additional ingredients.
Minimal monster faces
Skip the optional red gel and use only black stitches, eyes, chocolate hair, and neck bolts for a cleaner design.
More textured hair
Angle the chocolate-dipped end slightly before adding sprinkles to create an uneven hairline. Keep enough of the green surface visible for the eyes and mouth.
Party display
Arrange the finished monsters in rows on a dark serving tray, leaving space between them so the chocolate sides and peanut butter cup bolts remain intact.
Make-Ahead Instructions
The treats can be prepared the night before serving.
Once the chocolate and attachments have fully set, place the decorated bars in a very airtight container and store them at room temperature. Separate layers with parchment paper if stacking is necessary.
Room-temperature storage helps preserve a softer cereal texture. Make sure the container closes securely so the marshmallows and cereal are not exposed to air overnight.
Storage
The supplied recipe specifically supports making the treats one night ahead and keeping them in a tightly sealed room-temperature container.
For the best appearance:
- Allow the chocolate to set before storing.
- Use parchment between layers.
- Avoid placing heavy treats directly over decorated faces.
- Keep the container away from heat, which could soften the chocolate.
- Do not leave the container open longer than necessary.
Allergy and Serving Considerations
These treats contain milk and peanuts through the butter, chocolate, marshmallows, and Reese’s Minis, depending on individual product formulations. The cereal, candy eyes, sprinkles, gels, and chocolate may also carry additional allergen or gluten information.
Check every package label when serving anyone with allergies or dietary restrictions. Do not label the recipe gluten-free, nut-free, vegetarian, or suitable for another special diet unless all products used meet that requirement.
Equipment
- 13×9-inch baking pan
- Large pot
- Wooden spoon or heat-resistant spatula
- Parchment or wax paper
- Cutting board
- Sharp knife
- Microwave-safe glass or dipping bowl
- Parchment-lined tray
Halloween Rice Krispie Treats
Course: DessertCuisine: American10
servings30
minutes5
minutes376
kcal15
minutes50
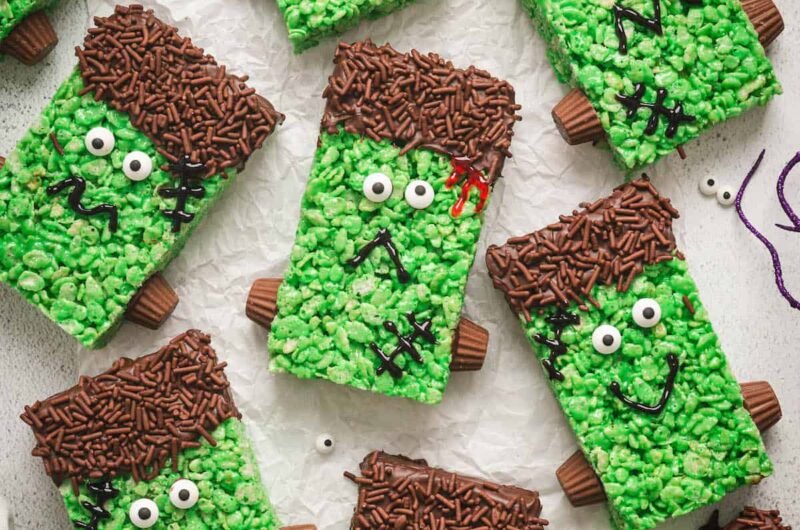
minutesGreen marshmallow cereal bars decorated with semisweet chocolate hair, sprinkles, candy eyes, peanut butter cup neck bolts, and gel-drawn monster faces.
Ingredients
Nonstick baking spray
4 tablespoons unsalted butter
10 ounces mini marshmallows, approximately 5½ cups
Pinch of kosher salt
Green food coloring, as needed
5 cups Rice Krispies cereal
8 ounces semisweet chocolate chips
¼ cup chocolate sprinkles
20 candy eyeballs
20 unwrapped Reese’s Minis
Black writing gel
Red writing gel, optional
Instructions
- Coat the bottom and sides of a 13×9-inch pan with nonstick baking spray.
- Melt the butter in a large pot over medium-low heat.
- Add the mini marshmallows, kosher salt, and enough green food coloring to begin creating a bright green shade.
- Stir continuously until the marshmallows are completely melted and smooth. Add more coloring gradually if needed.
- Remove the pot from the heat. Add the Rice Krispies cereal and fold until it is fully coated.
- Transfer the mixture to the prepared pan. Use lightly greased hands, a sprayed spatula, or parchment paper to press it into an even layer without compacting it too tightly.
- Let the slab cool at room temperature for 15 minutes.
- Turn it onto a cutting board. Cut it in half lengthwise, then cut each half crosswise into five rectangles to make ten treats.
- Place the chocolate chips in a microwave-safe glass or bowl. Microwave in 30-second intervals, stirring after each interval, until smooth.
- Dip one end of each treat into the melted chocolate and place it on parchment paper.
- Immediately add chocolate sprinkles to the wet chocolate.
- Use small amounts of the remaining melted chocolate to attach two candy eyes and two Reese’s Minis to each treat.
- Draw mouths and stitches with black writing gel. Add optional red writing gel if desired.
- Let the chocolate and decorations set before serving or storing.
Notes
- Use fresh mini marshmallows for the best texture.
- The amount of green coloring depends on the product’s concentration.
- Add food coloring gradually and mix it completely before deciding whether more is needed.
- Do not overheat the marshmallows.
- Press the cereal mixture evenly but not excessively firmly.
- Lightly spray your hands or tools to prevent sticking.
- Add sprinkles immediately after dipping each treat.
- Store finished treats in a very airtight container at room temperature if preparing them the night before.
- This recipe contains peanut butter cups. Check all ingredient labels when serving anyone with allergies.
Nutritional Information
Estimated per serving:
- Calories: 376 kcal
- Carbohydrates: 56 g
- Protein: 4 g
- Fat: 16 g
- Saturated Fat: 9 g
- Polyunsaturated Fat: 1 g
- Monounsaturated Fat: 5 g
- Trans Fat: 0.2 g
- Cholesterol: 14 mg
- Sodium: 124 mg
- Potassium: 173 mg
- Fiber: 2 g
- Sugar: 35 g
- Vitamin A: 1086 IU
- Vitamin C: 9 mg
- Calcium: 22 mg
- Iron: 6 mg
Nutritional Information Disclaimer
Nutrition information is an estimate and may vary depending on the cereal, marshmallows, chocolate, candy, decorations, and actual serving sizes used.
How many Frankenstein treats does this recipe make?
It makes ten rectangular treats. Cut the 13×9-inch slab in half lengthwise, then divide each half into five pieces.
How much green food coloring should I use?
There is no fixed amount because liquid, gel, and concentrated colorings vary in strength. Add a small amount to the melted marshmallows, stir completely, and continue gradually until the mixture is bright green.
Why should I use fresh marshmallows?
Fresh marshmallows are softer and generally melt more smoothly. Older marshmallows may be drier, which can affect the texture of the cereal bars.
Can I press the mixture into the pan with my hands?
Yes. Lightly coat your hands with nonstick spray first, or place greased parchment or wax paper over the mixture before pressing.
How firmly should I press the cereal mixture?
Press firmly enough to create an even slab and fill the corners, but do not compress it as tightly as possible. Heavy packing can make the bars dense and hard.
Can I make these treats the night before?
Yes. Let all chocolate decorations set, then store the treats in a very airtight container at room temperature overnight.
What are the Frankenstein neck bolts made from?
Each treat uses two unwrapped Reese’s Minis attached with melted chocolate. The full recipe requires 20 pieces.
How do I keep the chocolate sprinkles attached?
Add the sprinkles immediately after dipping each treat in chocolate. The chocolate must still be wet enough to hold them.
Can children help decorate the treats?
Children can help place sprinkles, candy eyes, and draw gel details with suitable supervision. An adult should handle the hot pot, melted marshmallow mixture, knife, and heated chocolate.