
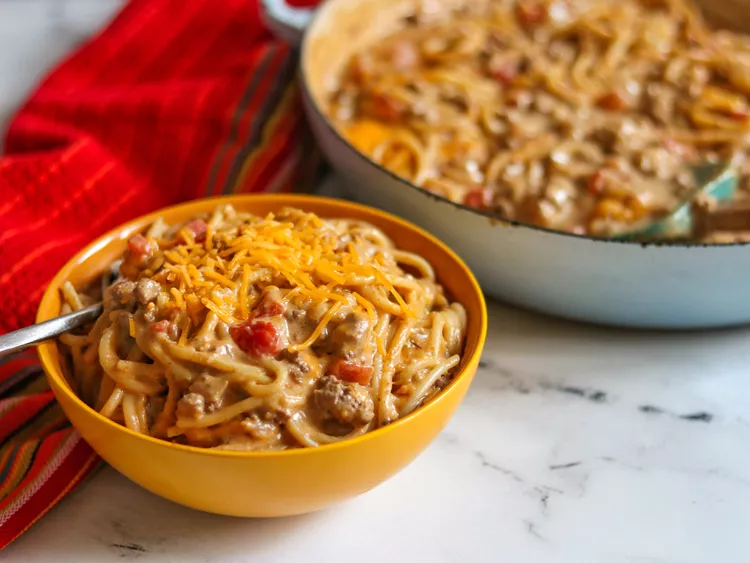
Cheesy Taco Pasta with Ground Beef – Easy 30-Minute Dinner
Ingredients
Method
- Bring a large pot of lightly salted water to a boil. Add the spaghetti and cook for 10–12 minutes, stirring occasionally, until tender but still slightly firm to the bite.
- While the pasta cooks, place a large skillet over medium heat. Add the ground beef and diced onion. Cook for about 5 minutes, breaking the beef into smaller pieces, until browned and the onion is soft and translucent.
- Stir the condensed cream of mushroom soup, diced tomatoes with green chiles, water, and taco seasoning into the beef mixture. Mix until the sauce is evenly combined.
- Add the cubed processed cheese. Stir for approximately 5 minutes, or until the cheese melts completely and the sauce becomes smooth and creamy.
- Drain the cooked spaghetti and transfer it directly to the skillet. Toss gently until the pasta is thoroughly coated with the cheesy taco sauce.
- Sprinkle shredded sharp Cheddar cheese evenly over the pasta. Cover the skillet and let it stand until the cheese melts.
- Serve warm while the cheese is soft and creamy.
Notes
- Spaghetti works well, but other pasta shapes can be used.
- For additional flavor, replace the water with an equal amount of beef or vegetable broth.
- Store leftovers in an airtight container in the refrigerator for up to 3 days.
- For longer storage, freeze in an airtight container for up to 3 months.
- The taco seasoning and tomatoes with green chiles provide much of the dish’s seasoning, so taste before adding extra salt.
When you’re choosing between tacos and pasta for dinner, this dish gives you a little of both. It has the savory, warmly spiced flavor of taco-seasoned beef, but everything comes together in a creamy cheese sauce that coats the pasta.
It’s especially convenient when you want a filling meal without spending too much time cooking or cleaning up.
- Ready in 30 minutes: The pasta and beef cook at the same time, making this a practical option for busy evenings.
- Extra creamy and cheesy: Processed cheese melts into the sauce, while sharp Cheddar adds a richer cheese flavor on top.
- Plenty of flavor: Taco seasoning, onions, and tomatoes with green chiles bring savory flavor and a little heat to every bite.
- Easy to customize: You can choose your favorite pasta shape, adjust the spice level, or add a few simple toppings.
- Everyday ingredients: Most of what you need comes from familiar pantry and refrigerator staples.

Super Easy Chicken and Dumplings Recipe – Creamy Comfort Food in 20 Minutes
Ingredients
Method
- Gather all ingredients and prepare a large saucepan. Make sure the chicken is already cooked and shredded before starting.
- Add the condensed cream of chicken soup, chicken broth, and shredded chicken to the saucepan. Stir well over medium-high heat until the ingredients are combined and the mixture begins to simmer.
- Open the refrigerated biscuit dough and cut each biscuit into four equal pieces to create bite-sized dumplings.
- Gently add the biscuit pieces to the simmering chicken mixture, stirring carefully to distribute them without breaking the dough apart.
- Reduce the heat to medium-low and cover the saucepan with a lid. Allow the dumplings to simmer for 10–15 minutes, or until they are cooked through and no longer doughy in the center.
- Check the center of a larger dumpling to confirm that it is fully cooked. Once the dumplings are tender and cooked through, remove the saucepan from the heat.
- Ladle the chicken and dumplings into serving bowls and enjoy warm.
Notes
- A combination of shredded cooked chicken breast and thigh meat provides a richer, more balanced chicken flavor.
- Sprinkle freshly chopped parsley over each serving for a fresh finish and a little extra color.
- For more flavorful dumplings, mix in dried herbs or sprinkle garlic powder or onion powder onto the biscuit dough before adding it to the soup.
- Keep the soup at a gentle simmer while the dumplings cook. A vigorous boil can cause the dough to break apart.
- The dumplings should be fully cooked in the center before serving. Check the largest piece if you’re unsure.
Chicken and dumplings is the kind of meal that feels especially comforting when you want something warm and filling. This shortcut version keeps the familiar creamy broth, tender chicken, and soft dumplings but skips the extra work of preparing dough from scratch.
With just four main ingredients and one saucepan, it’s an approachable dinner even when your cooking time is limited.
- Only four main ingredients: Condensed cream of chicken soup, chicken broth, cooked chicken, and refrigerated biscuits come together with very little preparation.
- Ready in 20 minutes: Using precooked chicken and prepared biscuit dough makes this a convenient choice for busy weeknights.
- Soft, tender dumplings: The biscuit pieces cook directly in the simmering broth, soaking up the savory chicken flavor as they become fluffy.
- Rich and creamy broth: Condensed soup creates a comforting, velvety base without requiring a separate flour-and-butter thickener.
- Easy to add flavor: A sprinkle of dried herbs, garlic powder, or onion powder can give the dumplings a different flavor without complicating the recipe.
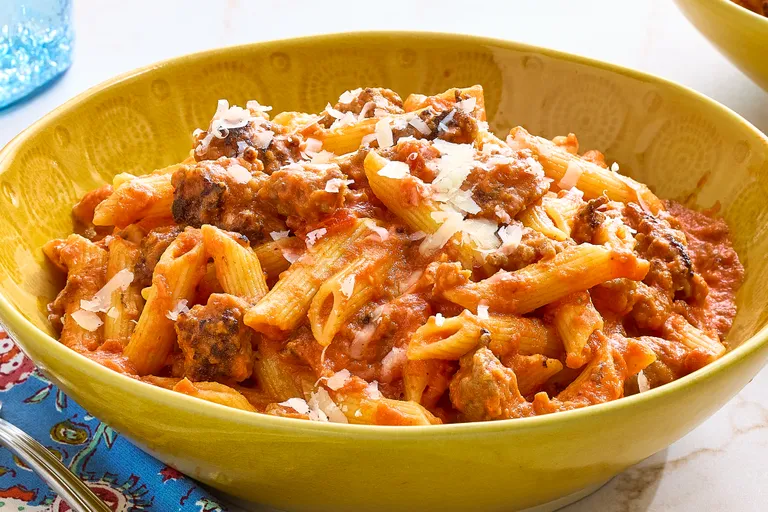
Creamy Penne alla Vodka with Italian Sausage – Easy 30-Minute Dinner
Ingredients
Method
- Gather and prepare all ingredients. Bring a large pot of lightly salted water to a boil. Add the penne and cook for approximately 11 minutes, stirring occasionally, until al dente. Drain the pasta and set aside.
- While the pasta cooks, heat the olive oil in a large skillet over medium heat. Remove the casings from the Italian sausage and add the meat to the skillet.
- Cook the sausage for 5–7 minutes, breaking it into small crumbles as it browns. Continue until the sausage is fully cooked and no pink remains.
- Add the minced garlic and crushed red pepper flakes. Stir gently until the garlic becomes lightly golden and fragrant, taking care not to burn it.
- Pour in the crushed tomatoes and add the salt. Stir to combine, then bring the mixture to a boil.
- Reduce the heat and allow the tomato sauce to simmer for 15 minutes, stirring occasionally to prevent sticking.
- Stir in the heavy whipping cream and vodka until evenly incorporated. Bring the sauce back to a boil, then immediately reduce the heat to low.
- Add the drained penne to the skillet and toss for approximately 1 minute until the pasta is evenly coated with the creamy tomato sauce.
- Stir in the freshly chopped parsley and serve warm.
Notes
- Sweet Italian sausage adds savory richness and a subtle sweetness that balances the tomato sauce and crushed red pepper flakes.
- The crushed red pepper flakes provide gentle heat. Adjusting the amount will change the spice level of the dish.
- Vodka is used to complement the tomato and cream flavors rather than create a noticeable alcoholic taste.
- Cooking reduces some of the alcohol, but it does not necessarily remove all of it.
- Avoid boiling the sauce vigorously for an extended period after adding the heavy cream, as excessive heat can affect its smooth texture.
- The stated 30-minute total is the supplied recipe estimate. Because the method includes a 15-minute sauce simmer after browning the sausage, actual cooking time may be longer depending on preparation and how much work is done simultaneously.
There’s something especially satisfying about a pasta dish that balances a rich tomato sauce with silky cream and just enough spice to keep every bite interesting. This penne alla vodka adds sweet Italian sausage to the classic combination, making it hearty enough to serve as a complete dinner.
The sauce is creamy without losing the bright flavor of tomatoes, while garlic and red pepper flakes bring warmth and depth.
- Rich, creamy tomato sauce: Heavy cream softens the acidity of crushed tomatoes and gives the sauce a smooth finish.
- Savory Italian sausage: Sweet Italian sausage adds extra flavor and makes the pasta more filling.
- A little spicy kick: Crushed red pepper flakes provide gentle heat that contrasts with the richness of the cream.
- Simple everyday preparation: The sauce comes together in one skillet while the pasta cooks separately.
- Great for family dinners: It makes eight servings and pairs easily with a salad or vegetables.

Crispy Baked Chicken Schnitzel – Easy Oven-Baked Recipe
Ingredients
Method
- Preheat the oven to 425°F (220°C). Line a large baking sheet with aluminum foil and drizzle it with olive oil. Place the baking sheet in the oven while it heats.
- Place the chicken breasts between two sheets of plastic wrap on a firm, flat surface. Using the smooth side of a meat mallet, gently pound each piece until it reaches an even ¼-inch thickness.
- Season both sides of the flattened chicken with salt and freshly ground black pepper.
- Prepare three shallow bowls for breading. Combine the flour and paprika in the first bowl. Whisk the eggs with a little salt and pepper in the second bowl. Mix the seasoned bread crumbs and fresh lemon zest in the third bowl.
- Coat each chicken piece lightly with the flour mixture, shaking off any excess. Dip it into the beaten eggs, allowing extra egg to drip away. Press both sides into the breadcrumb mixture until evenly coated.
- Transfer the breaded chicken to a plate in a single layer without stacking. Repeat until all the chicken pieces are coated.
- Carefully remove the hot baking sheet from the oven. Arrange the breaded chicken in a single layer, leaving a little space between the pieces. Drizzle additional olive oil lightly over each piece.
- Bake for 5–6 minutes, then carefully turn the chicken over. Continue baking for another 5–6 minutes, until the coating is lightly golden and the chicken is cooked through.
- Insert an instant-read thermometer into the thickest part of the chicken. It must register at least 165°F (74°C).
- Serve the schnitzel warm, preferably with fresh lemon wedges.
Notes
- Preheating the baking sheet helps the breading become crisp as soon as the chicken touches the hot surface.
- Pound the chicken to an even ¼-inch thickness for consistent cooking and a tender texture.
- Arrange the breaded chicken in a single layer and avoid overlapping the pieces.
- Fresh lemon wedges and German-style potato salad are recommended serving accompaniments.
- Store leftover cooked schnitzel in an airtight container in the refrigerator for up to 3 days.
- Reheat in the oven to help maintain the crispy coating, or use the microwave for convenience.
- To freeze, cool the cooked schnitzel completely, wrap each piece individually in plastic wrap, then wrap again in aluminum foil. Freeze for up to 3 months and thaw in the refrigerator before reheating.
- The stated nutritional information accounts for the full amount of breading ingredients. Actual calories may vary because some breading may remain unused.
- Although the supplied cook time is 10 minutes, the baking instructions call for 5–6 minutes per side, or approximately 10–12 minutes in total. Cook until the chicken reaches the required safe internal temperature.
Chicken schnitzel is known for its thin, tender meat and crisp breadcrumb coating. Traditionally, it’s cooked in oil until golden, but this oven-baked version offers a convenient alternative without the need for pan-frying.
The combination of paprika, seasoned bread crumbs, and fresh lemon zest gives the coating a savory flavor with a subtle citrus brightness.
- Crispy without deep-frying: A hot baking sheet and a light coating of olive oil help the breadcrumbs turn golden in the oven.
- Tender, evenly cooked chicken: Flattening the chicken breasts to a consistent thickness helps prevent dry edges and undercooked centers.
- Simple pantry ingredients: Flour, eggs, paprika, and breadcrumbs create a flavorful coating without complicated preparation.
- Fresh lemon flavor: Lemon zest adds a bright note to the breading and balances the savory chicken.
- Versatile for dinner: Serve it with potato salad, roasted vegetables, or a crisp green salad.
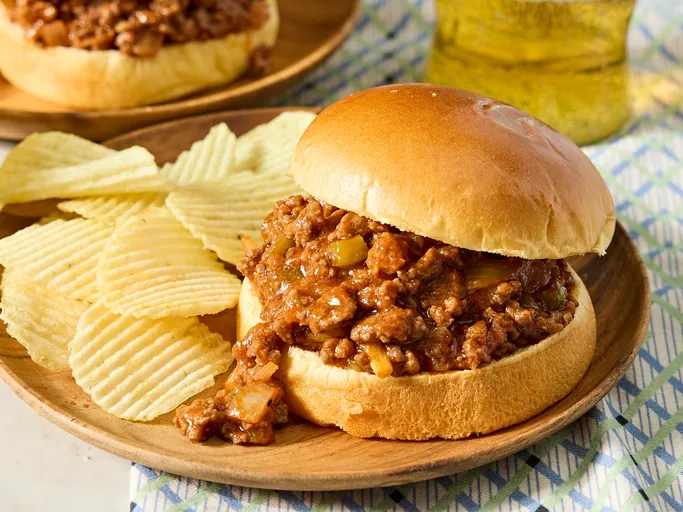
Homemade Sloppy Joes – Easy, Saucy Ground Beef Sandwiches
Ingredients
Method
- Heat a large skillet over medium heat. Add the ground beef and cook for 3–4 minutes, stirring and breaking the meat into small crumbles as some of the fat begins to render.
- Add the chopped onion and green bell pepper. Continue cooking for another 3–5 minutes, stirring occasionally, until the vegetables soften and the beef is completely browned and cooked through.
- If excess grease has accumulated in the skillet, carefully drain it before adding the sauce ingredients.
- Stir in the ketchup, brown sugar, yellow mustard, and garlic powder. Season with salt and freshly ground black pepper to taste.
- Reduce the heat to low and allow the mixture to simmer gently for 20–30 minutes, stirring occasionally, until the sauce thickens and coats the ground beef.
- Taste the filling and adjust the ketchup, brown sugar, or mustard if needed to achieve your preferred balance of sweet and tangy flavors.
- Divide the warm ground beef mixture evenly among the six split hamburger buns. Serve immediately.
Notes
- If using ground beef with a higher fat content, drain the excess grease before adding the sauce ingredients.
- Soft hamburger buns work especially well because they absorb some of the flavorful sauce.
- Adjust the ketchup, brown sugar, and mustard to suit your preferred sweetness and tanginess.
- Serve with sweet potato fries, potato wedges, coleslaw, or pickles.
- For make-ahead preparation, cook the meat mixture, cool it promptly, and refrigerate in an airtight container for up to 3 days.
- Reheat the filling thoroughly on the stovetop or in the microwave, then serve on fresh hamburger buns.
- The 30-minute cooking time is the supplied recipe estimate. Simmering for the full 30 minutes after browning the beef may increase the actual total cooking time.
Few sandwiches deliver the same comforting combination of savory meat, tangy sauce, and soft bread as a classic Sloppy Joe. The filling is rich and flavorful, with just enough sweetness to balance the ketchup and mustard.
Unlike versions made with a canned sauce, this recipe uses familiar ingredients that let you adjust the flavor to your liking.
- A satisfying homemade sauce: Ketchup, brown sugar, mustard, and garlic powder create a balanced mixture of sweet, tangy, and savory flavors.
- Simple, affordable ingredients: Ground beef, onion, bell pepper, and everyday pantry staples make this an approachable family meal.
- Easy skillet preparation: Everything cooks in one pan, keeping the process straightforward and cleanup manageable.
- Flexible seasoning: You can adjust the sauce to make it sweeter, tangier, or more savory without changing the cooking method.
- Great for preparing ahead: The meat mixture stores well and can be reheated when you’re ready to assemble fresh sandwiches.
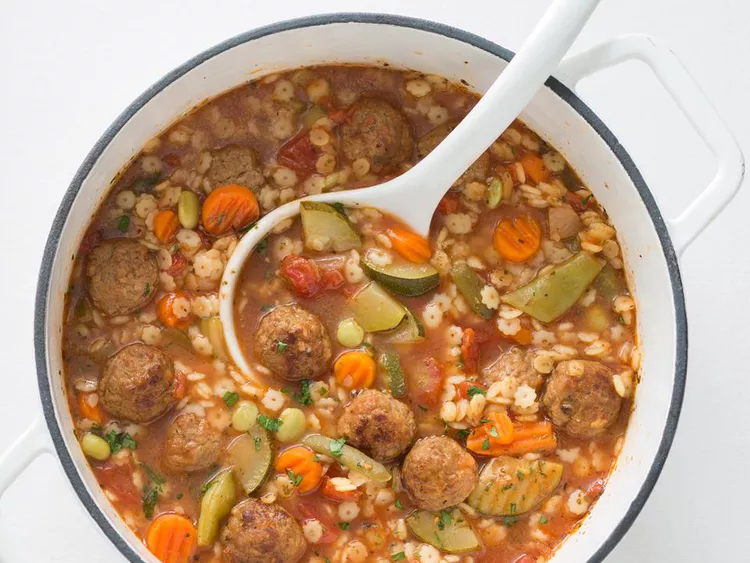
Hearty Italian Meatball Soup – Easy 30-Minute Comfort Food
Ingredients
Method
- Place a large soup pot over medium-high heat. Add the diced tomatoes with their juices, beef broth, water, and Italian seasoning. Stir everything together until evenly combined.
- Bring the broth mixture to a boil, allowing the tomatoes and seasonings to blend into the liquid.
- Add the frozen cooked Italian-style meatballs, frozen Italian-blend vegetables, and dried star-shaped pasta. Stir gently to distribute the ingredients throughout the soup.
- Bring the soup back to a boil, then reduce the heat to medium-low.
- Cook for approximately 10 minutes, stirring occasionally, until the pasta is tender, the vegetables are heated through, and the meatballs are thoroughly hot.
- Check that the meatballs are heated through to a safe internal temperature of 165°F (74°C). If the pasta or meatballs need more time, continue simmering until ready.
- Ladle the hot soup into individual serving bowls.
- Sprinkle the grated Parmesan cheese over each serving and enjoy warm.
Notes
- Use fully cooked frozen Italian-style meatballs. Cooking times may vary depending on their size and the manufacturer’s heating instructions.
- Frozen Italian-blend vegetables can be added directly to the soup without thawing.
- Small pasta shapes work best. If star-shaped pasta is unavailable, substitute another small pasta and adjust the cooking time according to its package instructions.
- Use the diced tomatoes with their juices to preserve the intended broth consistency and tomato flavor.
- Add Parmesan cheese to individual bowls just before serving rather than stirring it into the entire pot.
- Serve with crusty bread for a more substantial meal.
- The pasta will continue absorbing liquid as the soup sits, so leftovers may become thicker. Add a little water or broth when reheating if needed.
A good meatball soup brings together everything you want in a comforting meal: flavorful broth, tender meatballs, vegetables, and pasta that makes every spoonful satisfying.
This version keeps preparation simple by using frozen cooked meatballs and frozen vegetables. There’s no need to shape meatballs, chop several vegetables, or prepare a separate sauce.
- Ready in 30 minutes: Convenient ingredients and a straightforward simmering method make this soup suitable for busy days.
- Rich, savory broth: Beef broth, tomatoes with onion and garlic, and Italian seasoning create a flavorful base without complicated preparation.
- Hearty and filling: Meatballs and pasta turn a simple vegetable soup into a satisfying main course.
- Minimal preparation: Frozen meatballs and vegetables go directly into the pot, saving time and reducing cleanup.
- Easy to customize: Different small pasta shapes and compatible vegetable blends can work without changing the basic recipe.
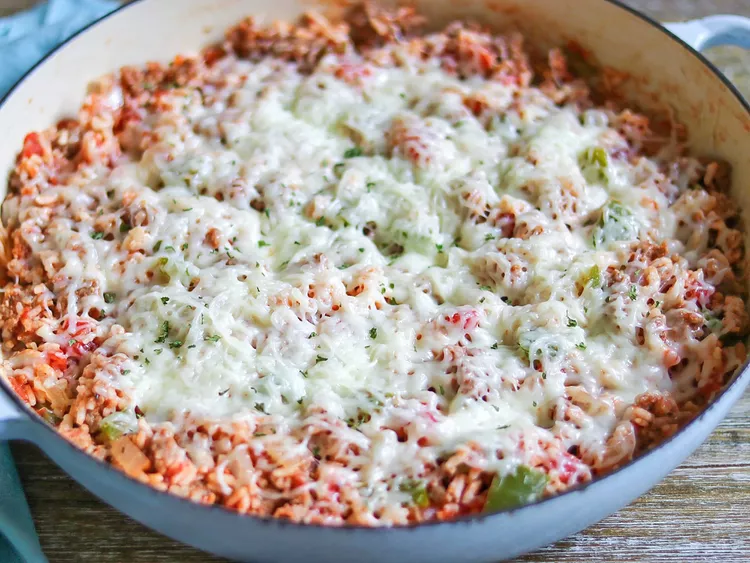
Quick Italian Sausage and Rice Skillet – Easy 30-Minute Dinner
Ingredients
Method
- Place a large skillet over medium heat. Add the Italian sausage, removing the casings first if necessary. Cook for 4–6 minutes, breaking the sausage into small pieces, until browned and no pink remains.
- Carefully drain any excess fat from the skillet to prevent the finished dish from becoming greasy.
- Add the chopped green bell pepper and onion to the cooked sausage. Continue cooking, stirring occasionally, until the vegetables are crisp-tender.
- Pour in the diced tomatoes and vegetable juice. Stir until evenly combined, then bring the mixture to a boil.
- Remove the skillet from the heat. Add the instant rice and stir gently until it is evenly distributed throughout the sausage and tomato mixture.
- Cover the skillet with a tight-fitting lid and let it stand for 5–8 minutes, or until the rice becomes tender and absorbs the liquid.
- Sprinkle the shredded mozzarella cheese evenly over the sausage and rice mixture.
- Cover the skillet again and allow it to stand until the mozzarella melts.
- Serve warm directly from the skillet.
Notes
- Use instant rice rather than regular uncooked rice. Instant rice is precooked and designed to absorb hot liquid quickly.
- According to the supplied recipe guidance, 1 cup of uncooked regular rice yields approximately 3 cups of cooked rice, while 1 cup of instant rice yields approximately 2 cups of cooked rice.
- Regular uncooked rice cannot be substituted directly without adjusting the cooking method, liquid, and cooking time.
- Drain excess sausage fat before adding the vegetables and liquid ingredients.
- Allow the skillet to remain covered while the instant rice absorbs the hot liquid.
- Keep the mozzarella covered until it melts from the residual heat.
- The standing time can vary from 5–8 minutes depending on the instant rice used.
Some evenings call for a filling dinner without juggling several pots and pans. This Italian sausage and rice skillet makes that possible by cooking everything in one pan, from the savory sausage and vegetables to the tomato-flavored rice.
The combination of sausage, green bell pepper, onion, and tomatoes creates a flavorful base, while instant rice absorbs the seasoned liquid. A layer of melted mozzarella finishes the dish with a creamy, cheesy touch.
- One-skillet convenience: Everything comes together in the same pan, which means less cleanup after dinner.
- Ready in 30 minutes: Instant rice cooks quickly, making this a practical option when you don’t have much time.
- Plenty of savory flavor: Italian sausage brings seasoning and richness, while tomatoes and vegetable juice add brightness.
- Hearty and satisfying: Rice, sausage, vegetables, and cheese create a complete main course.
- Easy to adjust: You can change the type of Italian sausage or add simple seasonings to suit your preferences.

Classic Patty Melt Recipe – Crispy Rye Bread, Juicy Beef & Melted Cheese
Ingredients
Method
- Place the ground beef in a bowl and season with salt and black pepper. Divide it into three equal portions and shape each into a thin patty that closely matches the size and shape of the rye bread.
- Press a small indentation into the center of each beef patty with your thumb. This helps prevent the patties from puffing up while cooking.
- Melt the butter in a large skillet over medium heat. Add the sliced onion and cook for 5–7 minutes, stirring occasionally, until soft and translucent. Transfer the cooked onion to a bowl and set aside.
- Place the beef patties in the same skillet. Cook for approximately 3–5 minutes per side, depending on their thickness, until browned and cooked through. For food safety, ground beef should reach an internal temperature of 160°F (71°C).
- Transfer the cooked patties to a plate. Carefully wipe the skillet clean to remove excess grease or browned residue.
- Spread 1 teaspoon of mayonnaise over one side of each slice of rye bread.
- Place three slices of bread in the skillet with the mayonnaise-coated sides facing down. Top each slice with one slice of Cheddar cheese, a cooked beef patty, one-third of the sautéed onions, and another slice of Cheddar.
- Place the remaining bread slices on top, keeping their mayonnaise-coated sides facing upward.
- Cook the sandwiches over medium heat for 3–4 minutes, until the bottom bread becomes golden brown and the cheese begins to melt.
- Carefully flip each sandwich using a wide spatula. Cook for another 3–4 minutes, until both sides are crisp and golden and the cheese is fully melted.
- Remove the patty melts from the skillet, slice if desired, and serve warm.
Notes
- The recipe makes 3 patty melt sandwiches.
- Jewish rye bread is a traditional choice, but other varieties of rye bread can also be used.
- For a less cheesy sandwich, use 1 slice of Cheddar per patty melt instead of 2.
- Shape the beef patties to match the bread rather than making them round. This helps distribute the meat evenly throughout each sandwich.
- A small indentation in the center of each patty helps it remain flatter while cooking.
- Spreading mayonnaise on the outside of the bread helps create an evenly browned, crisp crust.
- The onions are cooked until softened and translucent. For deeper caramelization, they would need additional cooking time.
- The supplied total time is 35 minutes, although the listed preparation and cooking times add up to 30 minutes.
A patty melt combines the best parts of a cheeseburger and a grilled cheese sandwich. Instead of a hamburger bun, a seasoned beef patty sits between slices of rye bread with melted cheese and tender onions.
The bread becomes golden and crisp in the skillet, while the cheese softens around the warm beef and onions. Every bite offers a combination of crunchy, juicy, savory, and creamy textures.
- Crispy rye bread: A thin layer of mayonnaise helps the bread develop an evenly golden crust without needing additional butter for grilling.
- Juicy, flavorful beef: Simple salt and pepper seasoning allows the natural flavor of the ground beef to stand out.
- Double the cheese: Two slices of sharp Cheddar per sandwich create a generous melted layer.
- Tender, buttery onions: Cooking the onions in butter softens their sharpness and brings out a mild sweetness.
- Easy skillet preparation: Everything cooks in one skillet, making this a practical choice for lunch or dinner.

Creamy Crab and Corn Soup – Easy 30-Minute Seafood Chowder
Ingredients
Method
- Place a heavy-bottomed pot over medium-low heat. Add the butter and allow it to melt completely without browning.
- Sprinkle in the all-purpose flour and stir continuously until the butter and flour form a smooth mixture. Keep the mixture pale rather than allowing it to brown.
- Gradually pour in the whole milk, stirring constantly to prevent lumps. Add the half-and-half and continue stirring until the soup base becomes smooth and creamy.
- Stir in the whole kernel corn and chopped green onions. Cook for a few minutes, stirring occasionally, until the vegetables are tender.
- Gently fold in the crabmeat, white pepper, seasoning salt, and soy sauce. Stir carefully to distribute the ingredients without breaking the crabmeat into very small pieces.
- Reduce the heat if necessary and allow the soup to simmer gently until heated through. Small bubbles should begin forming around the edges, but the soup should not come to a full boil.
- Taste the soup and adjust the seasonings if needed.
- Ladle the hot soup into individual bowls, garnish with freshly chopped parsley, and serve immediately.
Notes
- Fresh corn can replace frozen or canned corn. Remove the kernels from 4 ears of corn, scrape the cobs to collect their juices, and add both to the soup. Cook until the corn becomes tender.
- If fresh crabmeat is unavailable, combine 1 (7½-ounce) can of drained crabmeat with 8 ounces of imitation crabmeat cut into small pieces. Prepare the soup using the same method.
- Avoid boiling the soup after adding the crabmeat. Heat gently until small bubbles appear around the edges.
- Stir carefully after adding the crab to help preserve larger pieces of meat.
- Garnish individual servings with chopped parsley and serve hot.
- The nutritional estimate may vary depending on the crabmeat, dairy products, and other ingredients used.
A good crab and corn soup should let the seafood shine while providing enough creaminess to make every spoonful comforting. This recipe achieves that balance with tender crabmeat, sweet corn, and a smooth, creamy base.
The natural sweetness of the corn complements the delicate crab, while green onions, white pepper, and a little soy sauce add savory depth without overpowering the seafood.
- Rich and creamy texture: Whole milk and half-and-half create a smooth, velvety soup without making a separate cream sauce.
- Sweet and savory flavor: Tender crabmeat and sweet corn work together beautifully, with soy sauce adding subtle umami.
- Ready in 30 minutes: The soup comes together quickly in one pot, making it practical for a weeknight meal.
- Flexible seafood options: Fresh crabmeat gives the soup a delicate flavor, but canned crabmeat and imitation crab can also be used.
- Suitable for any season: Enjoy it warm on a chilly evening or serve it as a satisfying seafood lunch throughout the year.
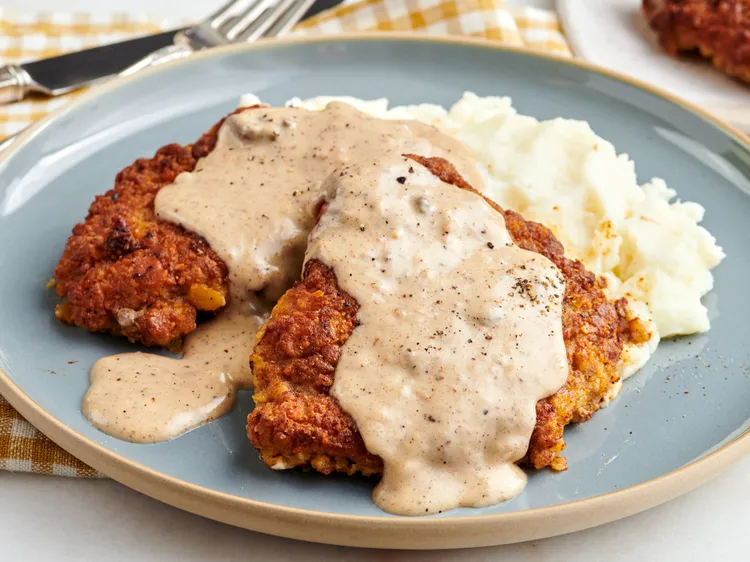
Crispy Country Fried Steak Recipe – Easy Southern-Style Comfort Food
Ingredients
Method
- In a shallow bowl, whisk together the milk and egg until thoroughly combined. Set aside.
- In another shallow bowl, mix the flour, crushed saltine crackers, seasoned salt, onion powder, garlic powder, and Montreal steak seasoning. Stir until the seasonings are evenly distributed throughout the breading.
- Dip one cube steak into the egg and milk mixture, coating both sides. Lift it out and allow the excess liquid to drip back into the bowl.
- Transfer the steak to the seasoned flour mixture. Press the coating firmly onto both sides until the steak is evenly covered.
- Place the breaded steak on a clean plate without stacking. Repeat the dipping and coating process with the remaining cube steaks.
- Heat the vegetable oil in a large skillet over medium-high heat until hot.
- Carefully place the coated steaks into the skillet in a single layer. Cook in batches if necessary to avoid overcrowding.
- Fry for approximately 4 minutes on the first side, until the coating becomes golden brown and crisp.
- Carefully turn the steaks and cook for another 4 minutes, or until the second side is golden and the meat is firm and hot throughout.
- Check the internal temperature with an instant-read thermometer. The supplied recipe specifies 160°F (70°C). Remove the steaks once they are safely cooked, and serve warm with country gravy and mashed potatoes.
Notes
- Cube steak is mechanically tenderized beef, making it suitable for quick pan-frying.
- Crushed saltine crackers give the breading an additional crunchy texture.
- Press the flour and cracker mixture firmly onto both sides of each steak to help it adhere during frying.
- For the best crust, avoid overcrowding the skillet and turn the steaks carefully.
- Creamy white country gravy and mashed potatoes are classic serving accompaniments.
- The supplied recipe uses an internal temperature of 160°F (70°C). Because cube steak is mechanically tenderized, follow applicable food safety guidance and ensure the steaks are thoroughly cooked.
- The published nutritional estimate includes the full amount of breading ingredients, although some may remain unused.
- The frying oil calculation assumes approximately 10% oil retention. Actual oil absorption depends on cooking conditions and the amount of oil remaining in the pan.
There’s something especially comforting about a piece of beef with a well-seasoned, golden crust, particularly when it’s served alongside creamy gravy and fluffy mashed potatoes.
Country fried steak turns simple cube steaks into a hearty dinner by coating them in seasoned flour and crushed saltine crackers before frying them in a skillet.
The crackers give the breading a slightly different texture from ordinary flour-coated steak, helping create a satisfying crunch.
Perfect with comfort-food sides: Creamy country gravy, mashed potatoes, and vegetables turn the steaks into a complete meal.
Extra-crispy coating: Crushed saltine crackers add texture to the flour mixture, creating a golden crust with a noticeable crunch.
Packed with savory flavor: Garlic powder, onion powder, seasoned salt, and Montreal steak seasoning give the beef a flavorful exterior.
Quick skillet cooking: Thin cube steaks cook relatively quickly, making this recipe practical for a satisfying dinner.
Simple ingredients: The breading relies on familiar pantry staples rather than complicated seasoning blends or special equipment.