Easy Homemade Fruit Snacks for Kids and Families
Ingredients
Method
- Place silicone molds on a large baking sheet or line an 8×8’ square dish with wax paper and lightly grease, set aside.
- Place fruit, vegetable and ¼ cup apple juice in the container of a high powered blender (Vitamix) and secure the lid.
- Turn the machine on and slowly increase the speed to high. Blend on high until the mixture is smooth. (add more juice 1 Tablespoon at a time if necessary, until the mixture reaches a smooth consistency).
- Add honey and vanilla and blend until smooth
- Taste mixture and add more honey, if desired.
- Transfer the mixture to a small saucepan and whisk in gelatin.
- Heat on medium heat until gelatin is dissolved and mixture is no longer grainy (about 3 minutes).* Make sure it does not boil.
- Using a dropper, fill the silicone molds. Or pour your mixture into your prepared baking pan. (I suggest keeping the saucepan on the warm burner (with the heat source turned off) as you fill the molds. That way the mixture remains slightly warm and cools more slowly).
- Transfer to the refrigerator to set for at least 2 hours.
- Once set remove from molds and enjoy. If using a baking dish, remove from the dish, cut and serve or store.
Notes
Fruit: Different fruits may be used to create different colors and flavors. Avoid kiwi and pineapple because their enzymes can interfere with gelatin setting.
Vegetables: Use your preferred vegetables. Each mixture contains 1 cup of fruit and ¼ cup vegetables. You can use all fruit if you don’t want to add vegetables.
Juice: Organic, unsweetened juice is recommended. Apple juice has a neutral color and flavor, but another juice flavor may be used.
Raw vs. Cooked Vegetables: The vegetables in the suggested combinations are blended raw, including beets. If using sweet potatoes, cook them first and use the soft puree.
Blending: Use a high-powered blender to produce a smooth fruit and vegetable mixture.
Filling the Molds: Work quickly because the mixture begins to thicken as it cools. Keeping the saucepan on the warm burner with the heat turned off helps slow the cooling process.
Alternative to Molds: Spread the mixture into an 8×8-inch pan lined with wax paper. Once set, cut into pieces using a warm, sharp knife.
Serving: Serve slightly chilled or at room temperature.
Storage: Store homemade fruit snacks in an airtight container in the refrigerator for up to 2 weeks.
Freezing: Freeze in an airtight container for up to 2 months. Thaw slowly in the refrigerator before serving.
Nutrition: Nutritional information is automatically calculated and should only be used as an approximation.
Homemade fruit snacks turn fresh fruit, vegetables, apple juice, honey, and gelatin into colorful, chewy little bites. They’re naturally sweetened, easy to customize, and a practical alternative to packaged gummies when you want more control over the ingredients.
With just a few minutes of stovetop cooking and some refrigerator time, these fruit and vegetable gummies make a fun snack to prepare ahead. Choose from four fruit-and-vegetable combinations, or experiment with your own favorite flavors.
Why You’ll Love These Homemade Fruit Snacks
- Made with whole produce: Fresh fruit and vegetables provide the base rather than relying entirely on flavored juice.
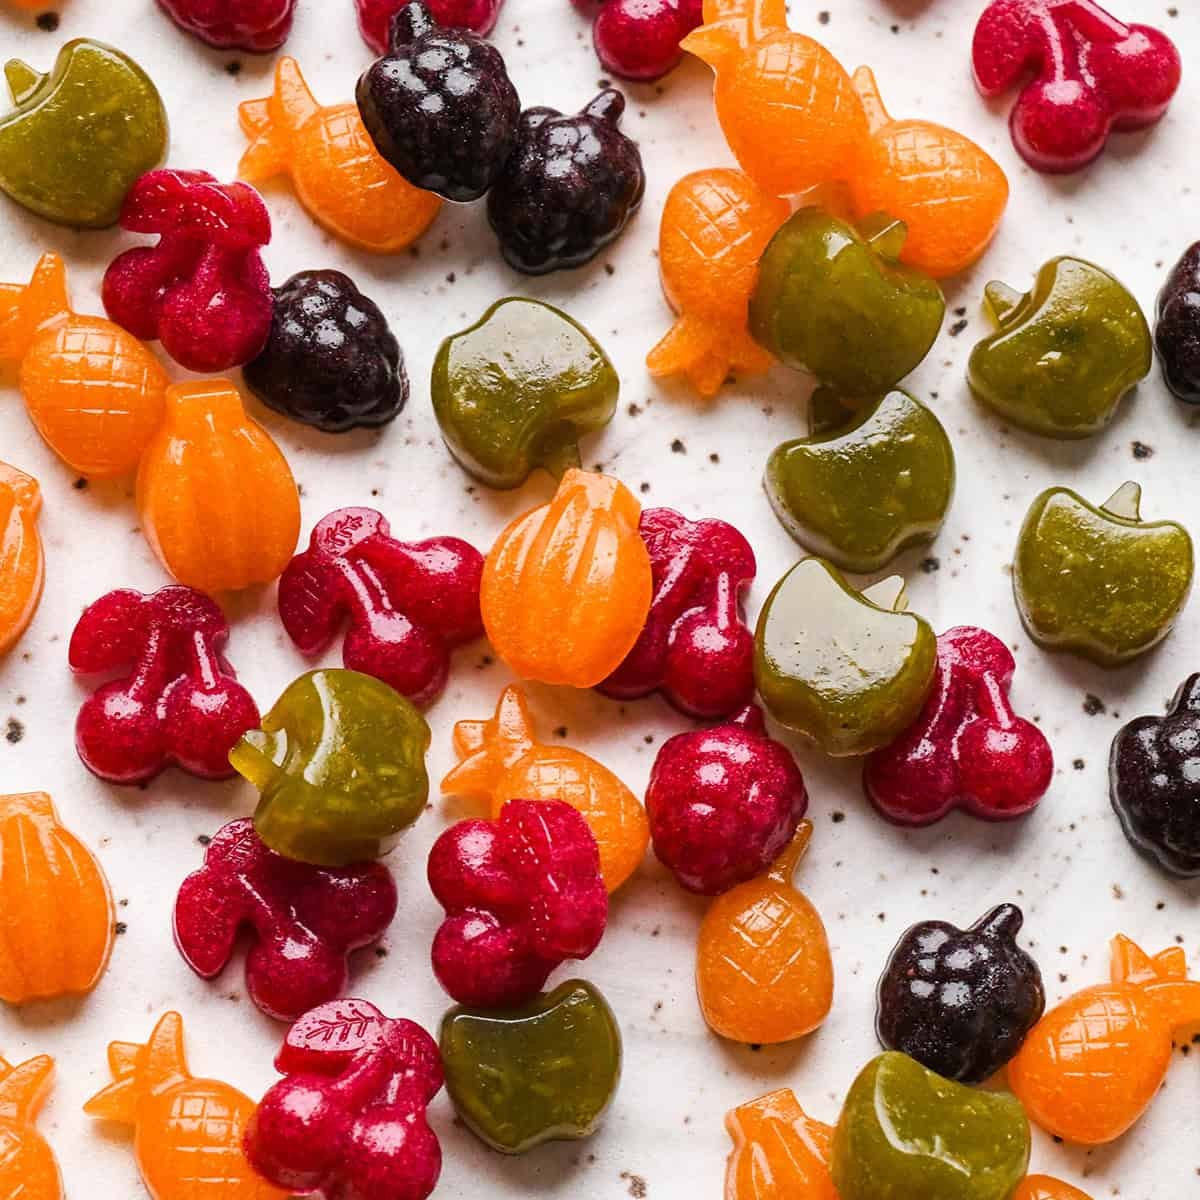
- Naturally colorful: Strawberries, blueberries, grapes, and peaches create different colors without needing artificial coloring.
- Customizable flavors: The same basic measurements work with several fruit-and-vegetable combinations.
- Simple preparation: A blender, small saucepan, and silicone molds are the main tools you need.
- Easy to prepare ahead: Once the gummies have set, you can keep them chilled for convenient snacking.
- Adjustable sweetness: Honey adds sweetness, and you can taste the blended mixture before adding the gelatin.
Ingredients You’ll Need
The ingredient list is short, but each component plays a role in the finished texture and flavor.
Basic Fruit Snack Mixture
- 1 cup chopped fruit
- ¼ cup chopped vegetables, peeled if necessary
- ¼ to ½ cup pure apple juice, with no added sugar
- 2 tablespoons raw honey
- ¼ teaspoon pure vanilla extract
- 3 tablespoons unflavored gelatin, preferably from grass-fed sources
What Each Ingredient Does
Fruit: Provides the primary flavor, natural sweetness, and color. Choose ripe fruit for a sweeter mixture and a smoother puree.
Vegetables: Add another source of produce without requiring a separate cooking process. Mild vegetables such as spinach and zucchini blend particularly well with fruit.
Apple juice: Helps the blender process the ingredients. Start with the smaller amount, then add more only if necessary. Too much liquid can affect the firmness of the gummies.
Honey: Sweetens the mixture and helps balance naturally tart fruit. The amount can be adjusted to taste, although extra honey will also change the overall sweetness.
Vanilla extract: Adds a subtle background flavor that rounds out the fruit mixture.
Gelatin: Gives the snacks their characteristic flexible, gummy texture as they cool. Use unflavored gelatin designed for setting foods, not collagen peptides, which do not create the same gel structure.
Four Natural Fruit Snack Colors
Green: Grape and Spinach
- 1 cup green grapes
- ¼ cup spinach
Green grapes provide sweetness, while spinach adds a natural green color. This is a useful option when you want to include leafy greens in a fruit-based snack.
Red: Strawberry and Beet
- 1 cup diced strawberries
- ¼ cup beets
Strawberries bring a fruity, slightly tart flavor, while beets deepen the red color. Chop the raw beets into small pieces before blending.
Orange: Peach and Carrot
- 1 cup chopped peaches
- ¼ cup carrots
Sweet peaches pair with carrots for a bright orange snack. A powerful blender helps incorporate the firm carrot pieces into a smooth mixture.
Blue/Purple: Blueberry and Zucchini
- 1 cup blueberries
- ¼ cup zucchini
Blueberries give this version its rich purple color and berry flavor. Zucchini has a relatively mild taste, making it easy to combine with fruit.
Each combination replaces the 1 cup fruit and ¼ cup vegetables in the basic recipe. Use the apple juice, honey, vanilla, and gelatin amounts for each separate batch.
How to Make Homemade Fruit Snacks
The key to making homemade gelatin gummies is creating a smooth fruit puree and dissolving the gelatin completely without boiling the mixture.
Step 1: Prepare the molds
Place silicone fruit snack molds on a large baking sheet so they’re easier to carry to the refrigerator.
If you don’t have silicone molds, line an 8×8-inch baking dish with wax paper and lightly grease it. The larger dish allows you to make a flat sheet of gummies that can be cut into individual pieces after chilling.
Step 2: Blend the fruit and vegetables
Add 1 cup chopped fruit, ¼ cup chopped vegetables, and ¼ cup apple juice to a high-powered blender.
Secure the lid, start at a low speed, and gradually increase to high. Blend until the mixture looks smooth and the vegetable pieces are fully incorporated.
If the blender struggles to process the ingredients, add additional apple juice 1 tablespoon at a time. Use only enough to achieve a smooth puree.
Step 3: Add the honey and vanilla
Add 2 tablespoons honey and ¼ teaspoon vanilla extract to the blender.
Blend again until everything is combined. Taste the mixture and adjust the sweetness with additional honey if needed.
Remember that naturally tart fruit may require a different sweetness level than ripe grapes or peaches.
Step 4: Dissolve the gelatin
Pour the blended mixture into a small saucepan and whisk in 3 tablespoons unflavored gelatin.
Heat over medium heat, stirring until the gelatin dissolves and the mixture no longer feels grainy. This takes approximately 3 minutes within the recipe’s 5-minute cooking allowance.
Do not allow the mixture to boil.
To check whether the gelatin has dissolved, let a small drop cool enough to touch, then rub it between your thumb and index finger. It should feel smooth rather than gritty.
Step 5: Fill the molds
Use a dropper to transfer the warm mixture into the silicone molds.
Work efficiently because the gelatin mixture starts to thicken as it cools. If necessary, leave the saucepan on the still-warm burner with the heat turned off while filling the molds.
Alternatively, pour the mixture into the prepared baking dish and spread it into an even layer.
Step 6: Refrigerate until firm
Carefully move the molds or baking dish to the refrigerator.
Chill for at least 2 hours, or until the gummies are firm enough to hold their shape when removed.
Avoid removing them prematurely, especially if you’re using small, detailed molds.
Step 7: Remove and serve
Gently release the set fruit snacks from their silicone molds.
If you used a baking dish, lift out the chilled sheet and slice it into bite-sized pieces using a warm, sharp knife.
Serve slightly chilled or at room temperature, and refrigerate any leftovers.
Tips for Smooth, Chewy Homemade Gummies
Use a high-powered blender
The smoother the fruit-and-vegetable puree, the more uniform the gummy texture will be. Firm vegetables, berry skins, and leafy greens need thorough blending to avoid noticeable pieces.
Add juice gradually
Start with ¼ cup apple juice rather than the full ½ cup. Adding too much liquid can dilute the fruit flavor and create a softer result.
Make sure the gelatin dissolves completely
Undissolved gelatin can create a grainy texture or uneven setting. Whisk thoroughly and use the smoothness test described in the instructions.
Don’t boil the mixture
Gentle heating is sufficient to dissolve the gelatin. Keep the saucepan at medium heat and remove it from the heat once the mixture is smooth.
Fill the molds before the mixture thickens
Gelatin begins setting as it cools. Have the molds ready before heating so you can transfer the mixture promptly.
Use fruits that work with gelatin
Fresh kiwi and pineapple contain enzymes that can prevent gelatin from setting properly. For reliable results, avoid using these fruits raw in this recipe.
Common Mistakes to Avoid
Adding too much apple juice
Excess liquid can weaken the final structure and reduce the intensity of the fruit flavor. Add juice gradually and stop once the ingredients blend smoothly.
Leaving lumps of gelatin
Gelatin needs to disperse and dissolve evenly. Whisk it thoroughly into the fruit mixture and continue gentle heating until the grainy texture disappears.
Letting the mixture cool before filling the molds
As the puree cools, it becomes thicker and harder to transfer through a small dropper. Prepare your equipment ahead of time.
Removing the gummies too soon
Fruit snacks need sufficient refrigerator time to develop their shape. Let them chill for at least the full 2 hours before attempting to unmold them.
Easy Ingredient Substitutions and Variations
Use different fruit: Try other suitable fruits that blend smoothly and work with gelatin. The flavor, color, sweetness, and texture may change depending on your choice.
Skip the vegetables: Replace the ¼ cup vegetables with an additional ¼ cup fruit. This creates a fruit-only variation while maintaining the same total amount of produce.
Change the juice: Unsweetened juice other than apple juice can work, although it will affect the finished flavor and possibly the color.
Try sweet potato: Cook sweet potato until soft before adding it to the blender. Unlike the raw vegetables in the original combinations, sweet potato should be cooked first.
Adjust the sweetness: Taste the fruit mixture before adding gelatin and modify the honey to suit the fruit’s natural sweetness.
Gelatin is essential to the texture of this particular recipe. Agar-agar is not a direct one-for-one substitute because it requires different preparation and produces a different type of set.
How to Serve Homemade Fruit Snacks
These gummies are especially convenient for small snack portions, after-school snacks, or a colorful addition to a snack platter.
You can serve them alongside fresh fruit, cheese, or other simple snacks to create a more substantial snack plate.
Smaller silicone molds make individual pieces, while a square baking dish produces a sheet that can be sliced into strips, cubes, or other shapes.
Because gelatin gummies can be chewy, consider the size and texture carefully when serving young children. They are not appropriate for infants, and honey should never be given to children under 12 months old.
Storing and Freezing Homemade Fruit Snacks
Refrigerator Storage
Keep the finished gummies in an airtight container in the refrigerator for up to 2 weeks, following the supplied recipe’s storage guidance.
Handle them with clean utensils, keep them refrigerated between servings, and discard them if they develop an unusual odor, visible mold, or other signs of spoilage.
Can You Freeze Homemade Fruit Snacks?
Yes. The supplied recipe allows freezing in an airtight container for up to 2 months.
Thaw them slowly in the refrigerator before serving. Freezing and thawing may slightly change the texture, so the refrigerated version is preferable when you want the most consistent chew.
Do Homemade Fruit Snacks Need Reheating?
No. These fruit snacks are ready to eat once set. Serve them slightly chilled or let them sit briefly at room temperature.
Heating them again can soften or melt the gelatin structure.
Frequently Asked Questions
Are homemade fruit snacks healthier than store-bought gummies?
Homemade fruit snacks let you control the fruit, vegetable, juice, and sweetener ingredients. They also contain whole fruit and vegetables rather than relying solely on flavored syrups. However, they still contain sugars from fruit, juice, and honey, so nutritional benefits depend on the ingredients and serving size.
Why aren’t my homemade fruit snacks setting?
The most likely causes are insufficiently dissolved gelatin, too much added liquid, or using fresh fruit containing enzymes that interfere with gelatin. Check the ingredient ratios and allow the full chilling time.
Can I make fruit snacks without silicone molds?
Yes. Pour the mixture into a lightly greased, wax-paper-lined 8×8-inch baking dish. After chilling, remove the sheet and cut it into pieces.
Can I use frozen fruit?
Frozen fruit may work once thawed, but it can release extra liquid. Drain excess thawing liquid and adjust the apple juice cautiously to avoid making the mixture too watery.
Can I make these fruit snacks vegan?
Not with the recipe as written. Gelatin is animal-derived, and honey is also not considered vegan. A vegan alternative would require a different gelling ingredient and reformulated cooking instructions.
Why are my homemade gummies grainy?
Graininess usually indicates that the gelatin has not dissolved completely or that the produce wasn’t blended thoroughly. Blend until smooth and gently heat the mixture until no gelatin granules remain.
Can I make these fruit snacks ahead of time?
Yes. The recipe requires at least 2 hours of chilling and can be prepared before you need to serve it. Store the finished pieces in an airtight container in the refrigerator.
Are homemade fruit snacks high in protein?
Gelatin contributes protein, but the actual protein content depends on the gelatin product and serving size. Without a verified protein calculation, these should not automatically be classified as a high-protein snack.